Description
Introduction
The goal of this project is to create a physical traffic signal that pulls status information from a remote source and updates the red, yellow, and green lights for the respective status. This project is based off an Arduino Uno with an Atmega328 Microcontroller in combination with a CopperHead WiFi Shield driving a self built relay controller for the individual lamps.
I built this traffic light for my previous employer, A Small Orange, a high quality provider of shared, reseller, VPS, and dedicated web hosting (equipped with the power of ninjas). This traffic signal, which they are going to put up in their Durham, NC headquarters, will display the overall status of operations at the company.
Project Video
This is a video of the Traffic Light cycling through the various modes.
Project Pictures
At The Office
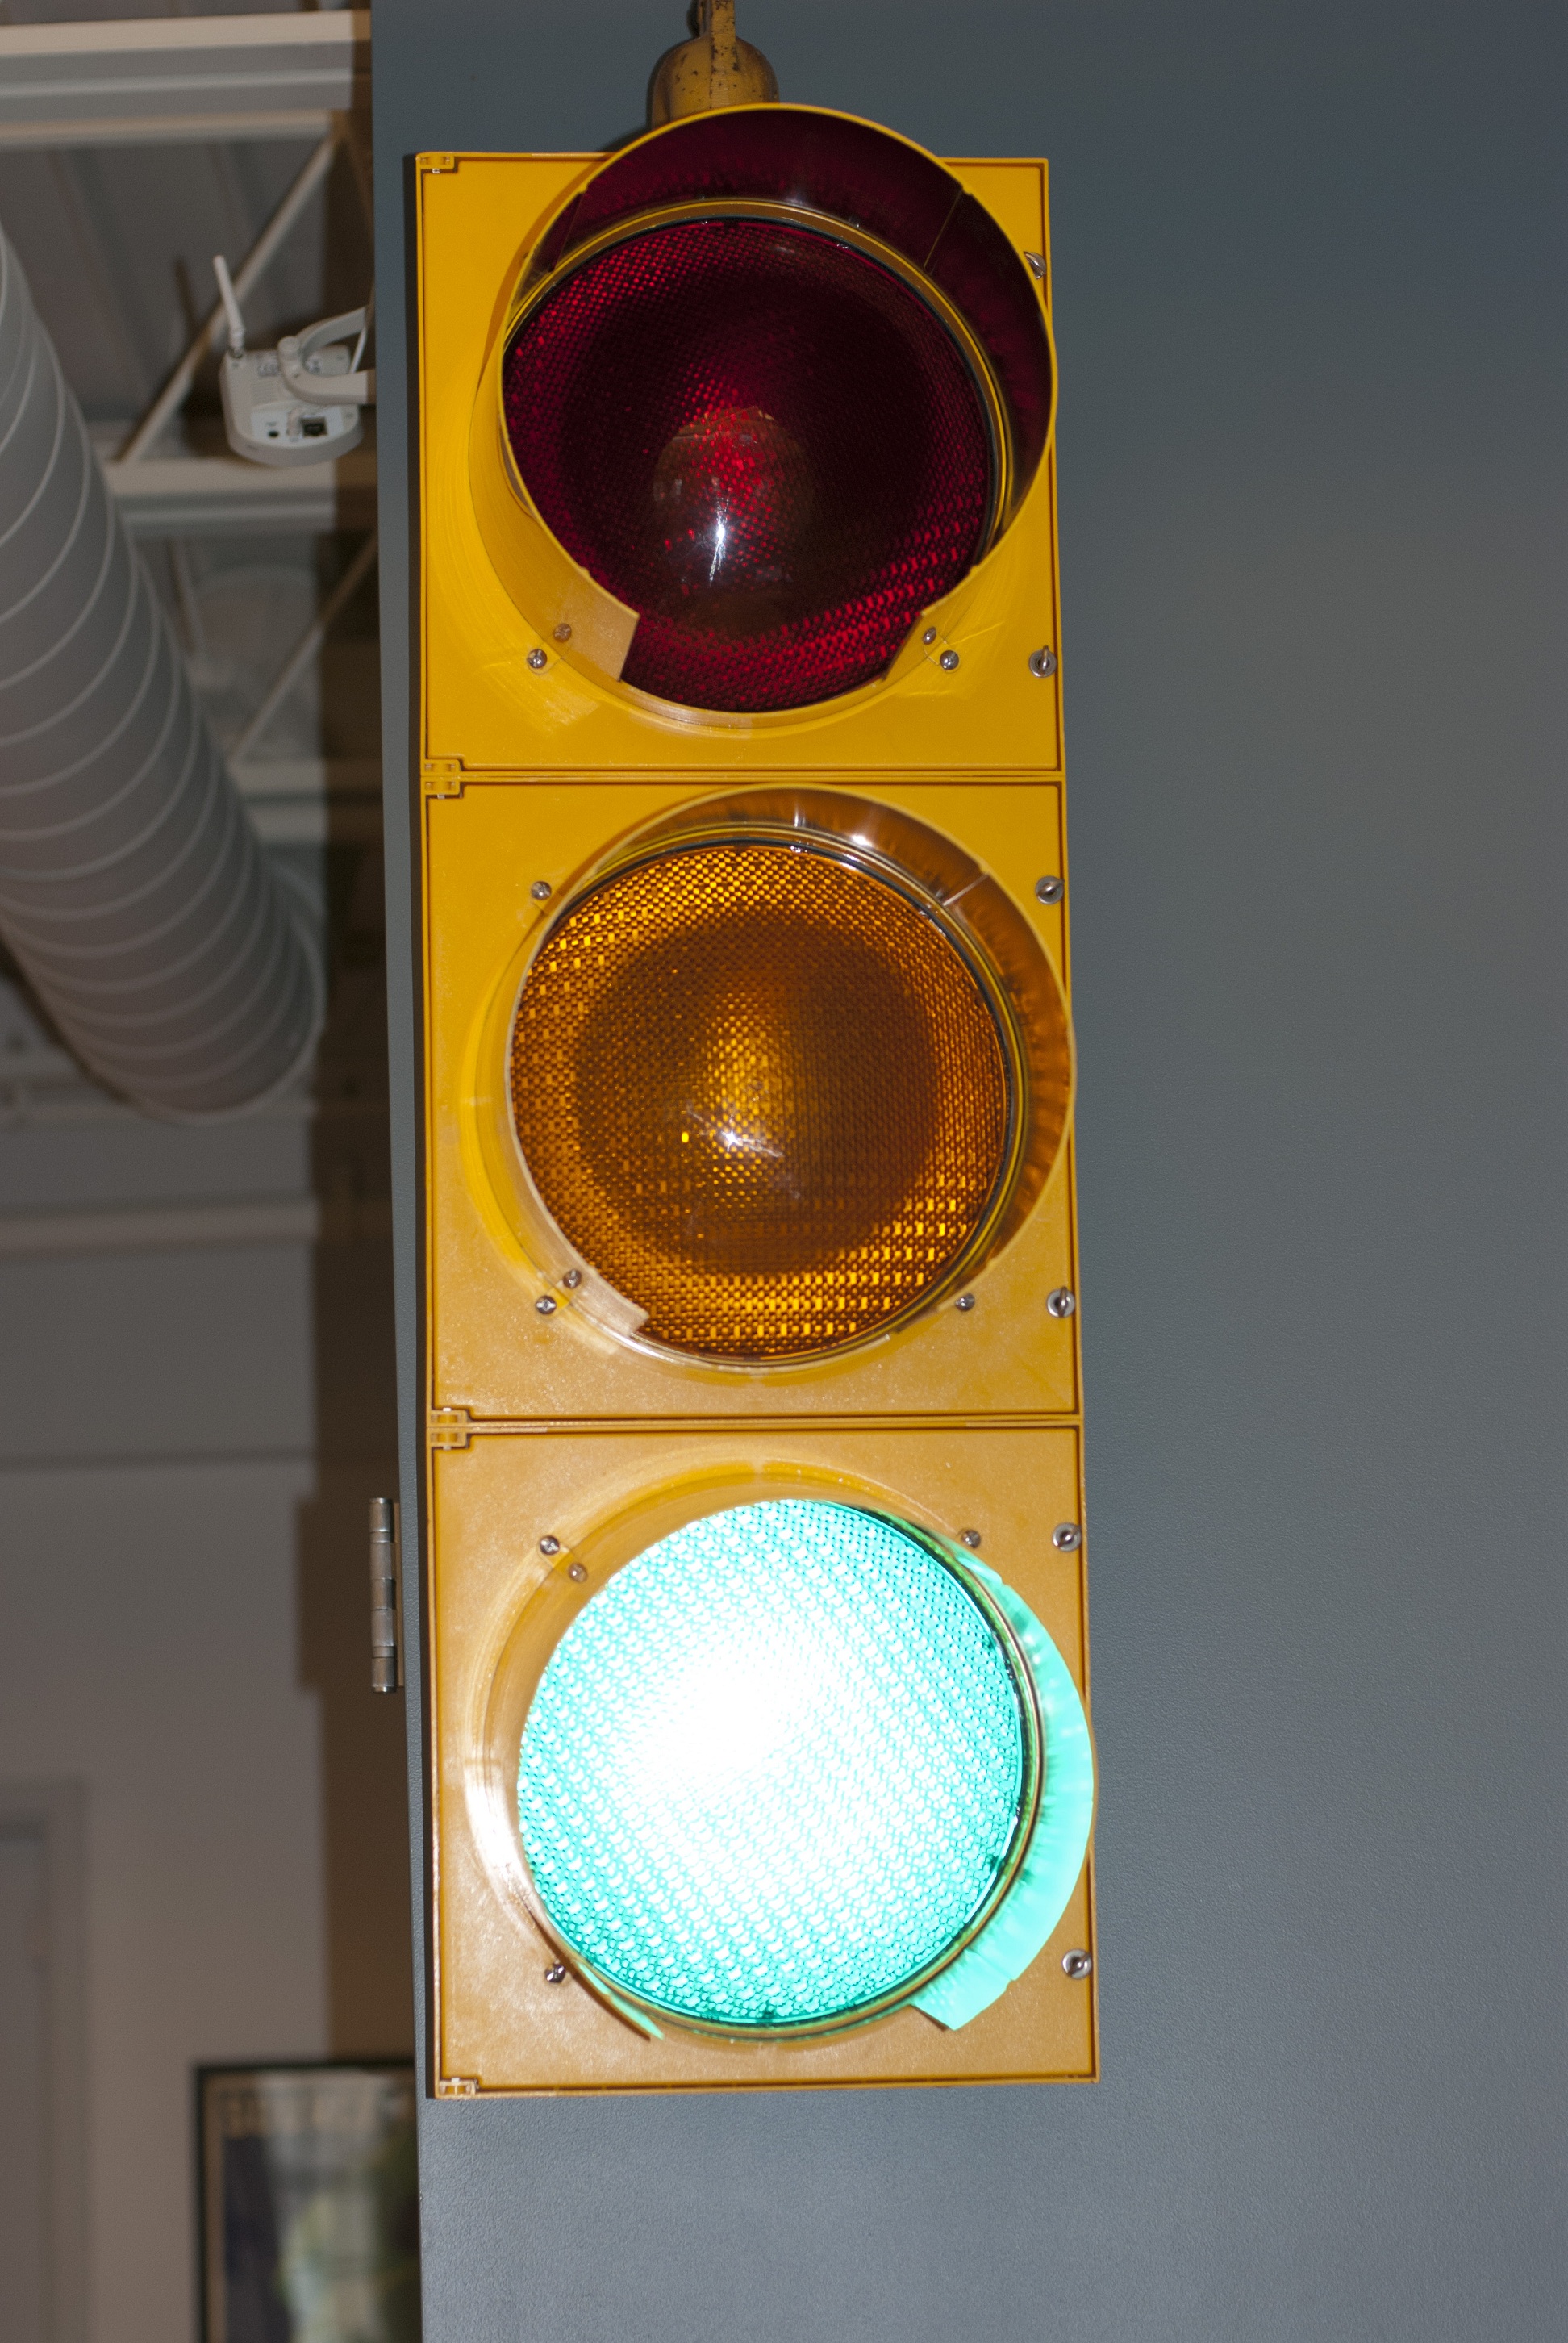
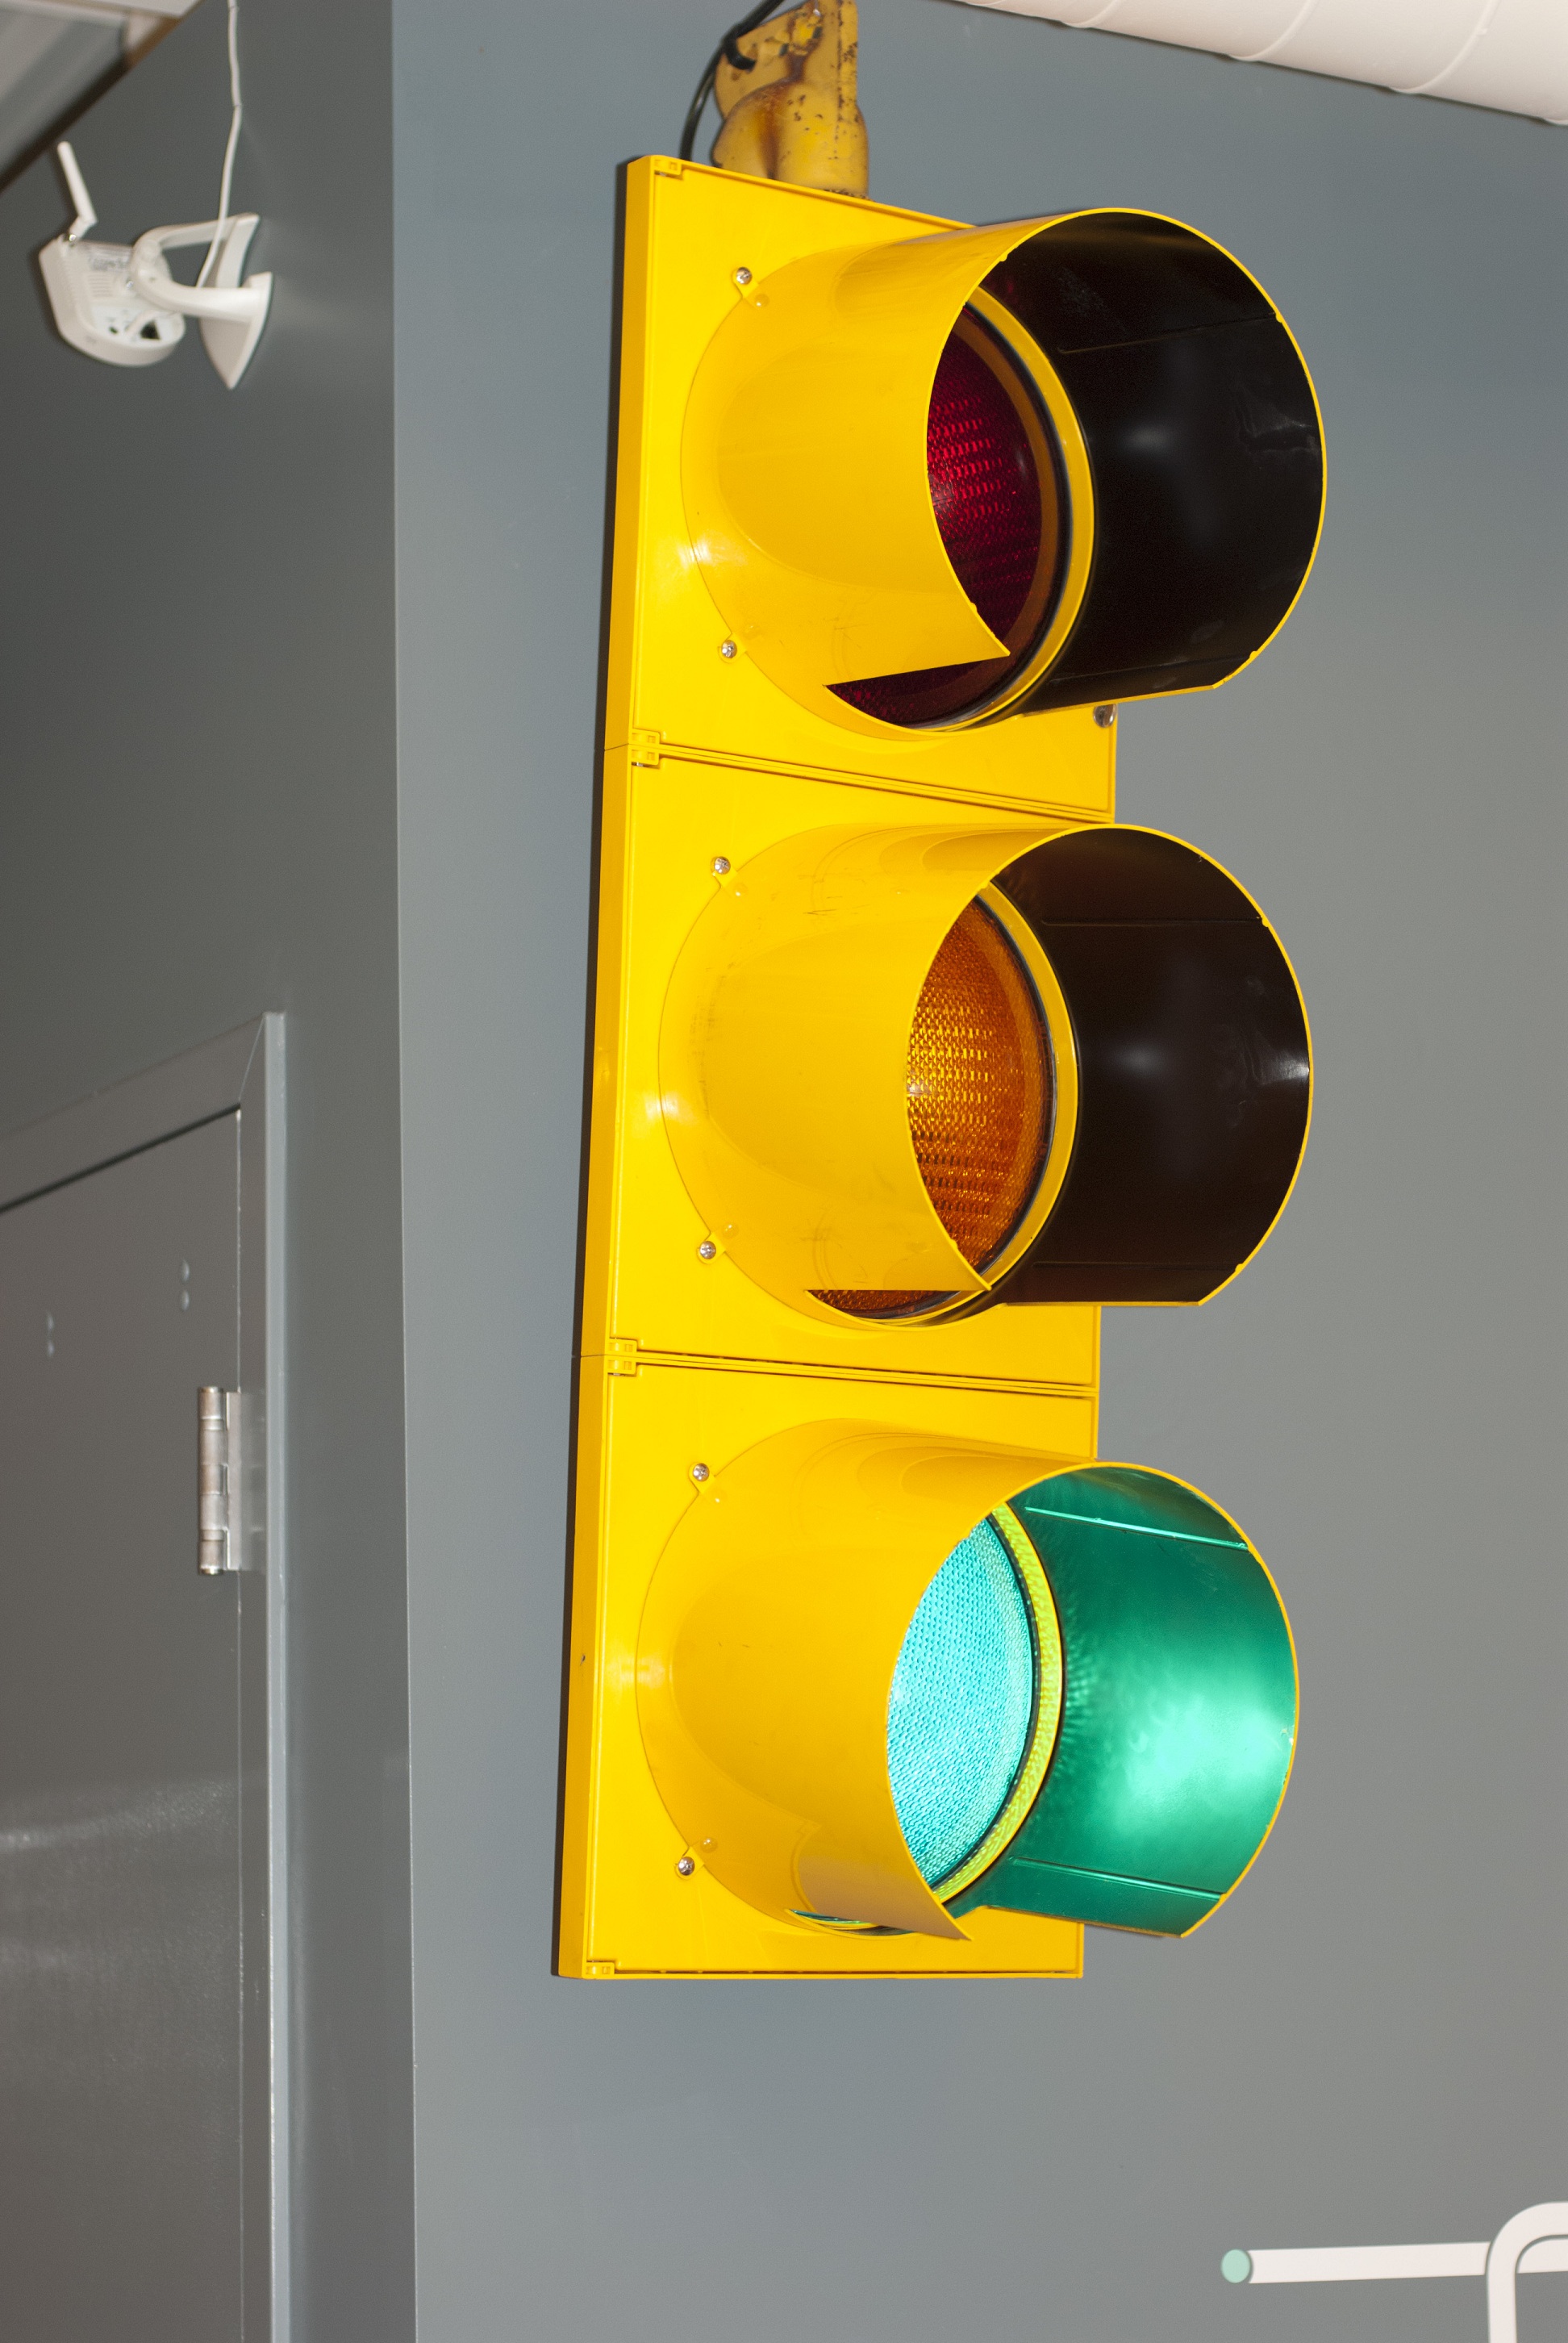
Some close up shots of the traffic light hanging in the company office.

A zoomed out shot of the finished product installed in my employer’s office on display for all to see.
Arduino


Many are familiar with the Arduino, for the uninitiated the Arduino is a prototyping platform driven by a Microcontroller (like a whole computer on a single chip) that is programmable over usb using an easy to learn IDE. The Arduino has a huge following and many forums and discussion sites have sections dedicated to the Arduino, some actually completely revolve around it. It is with communities like this that projects like this are possible. Credit goes to ASyncLabs for developing the WiServer library, the Arduino team for its continued work on open hardware and software development, and the many other WiServer inspired projects.
Relay Board
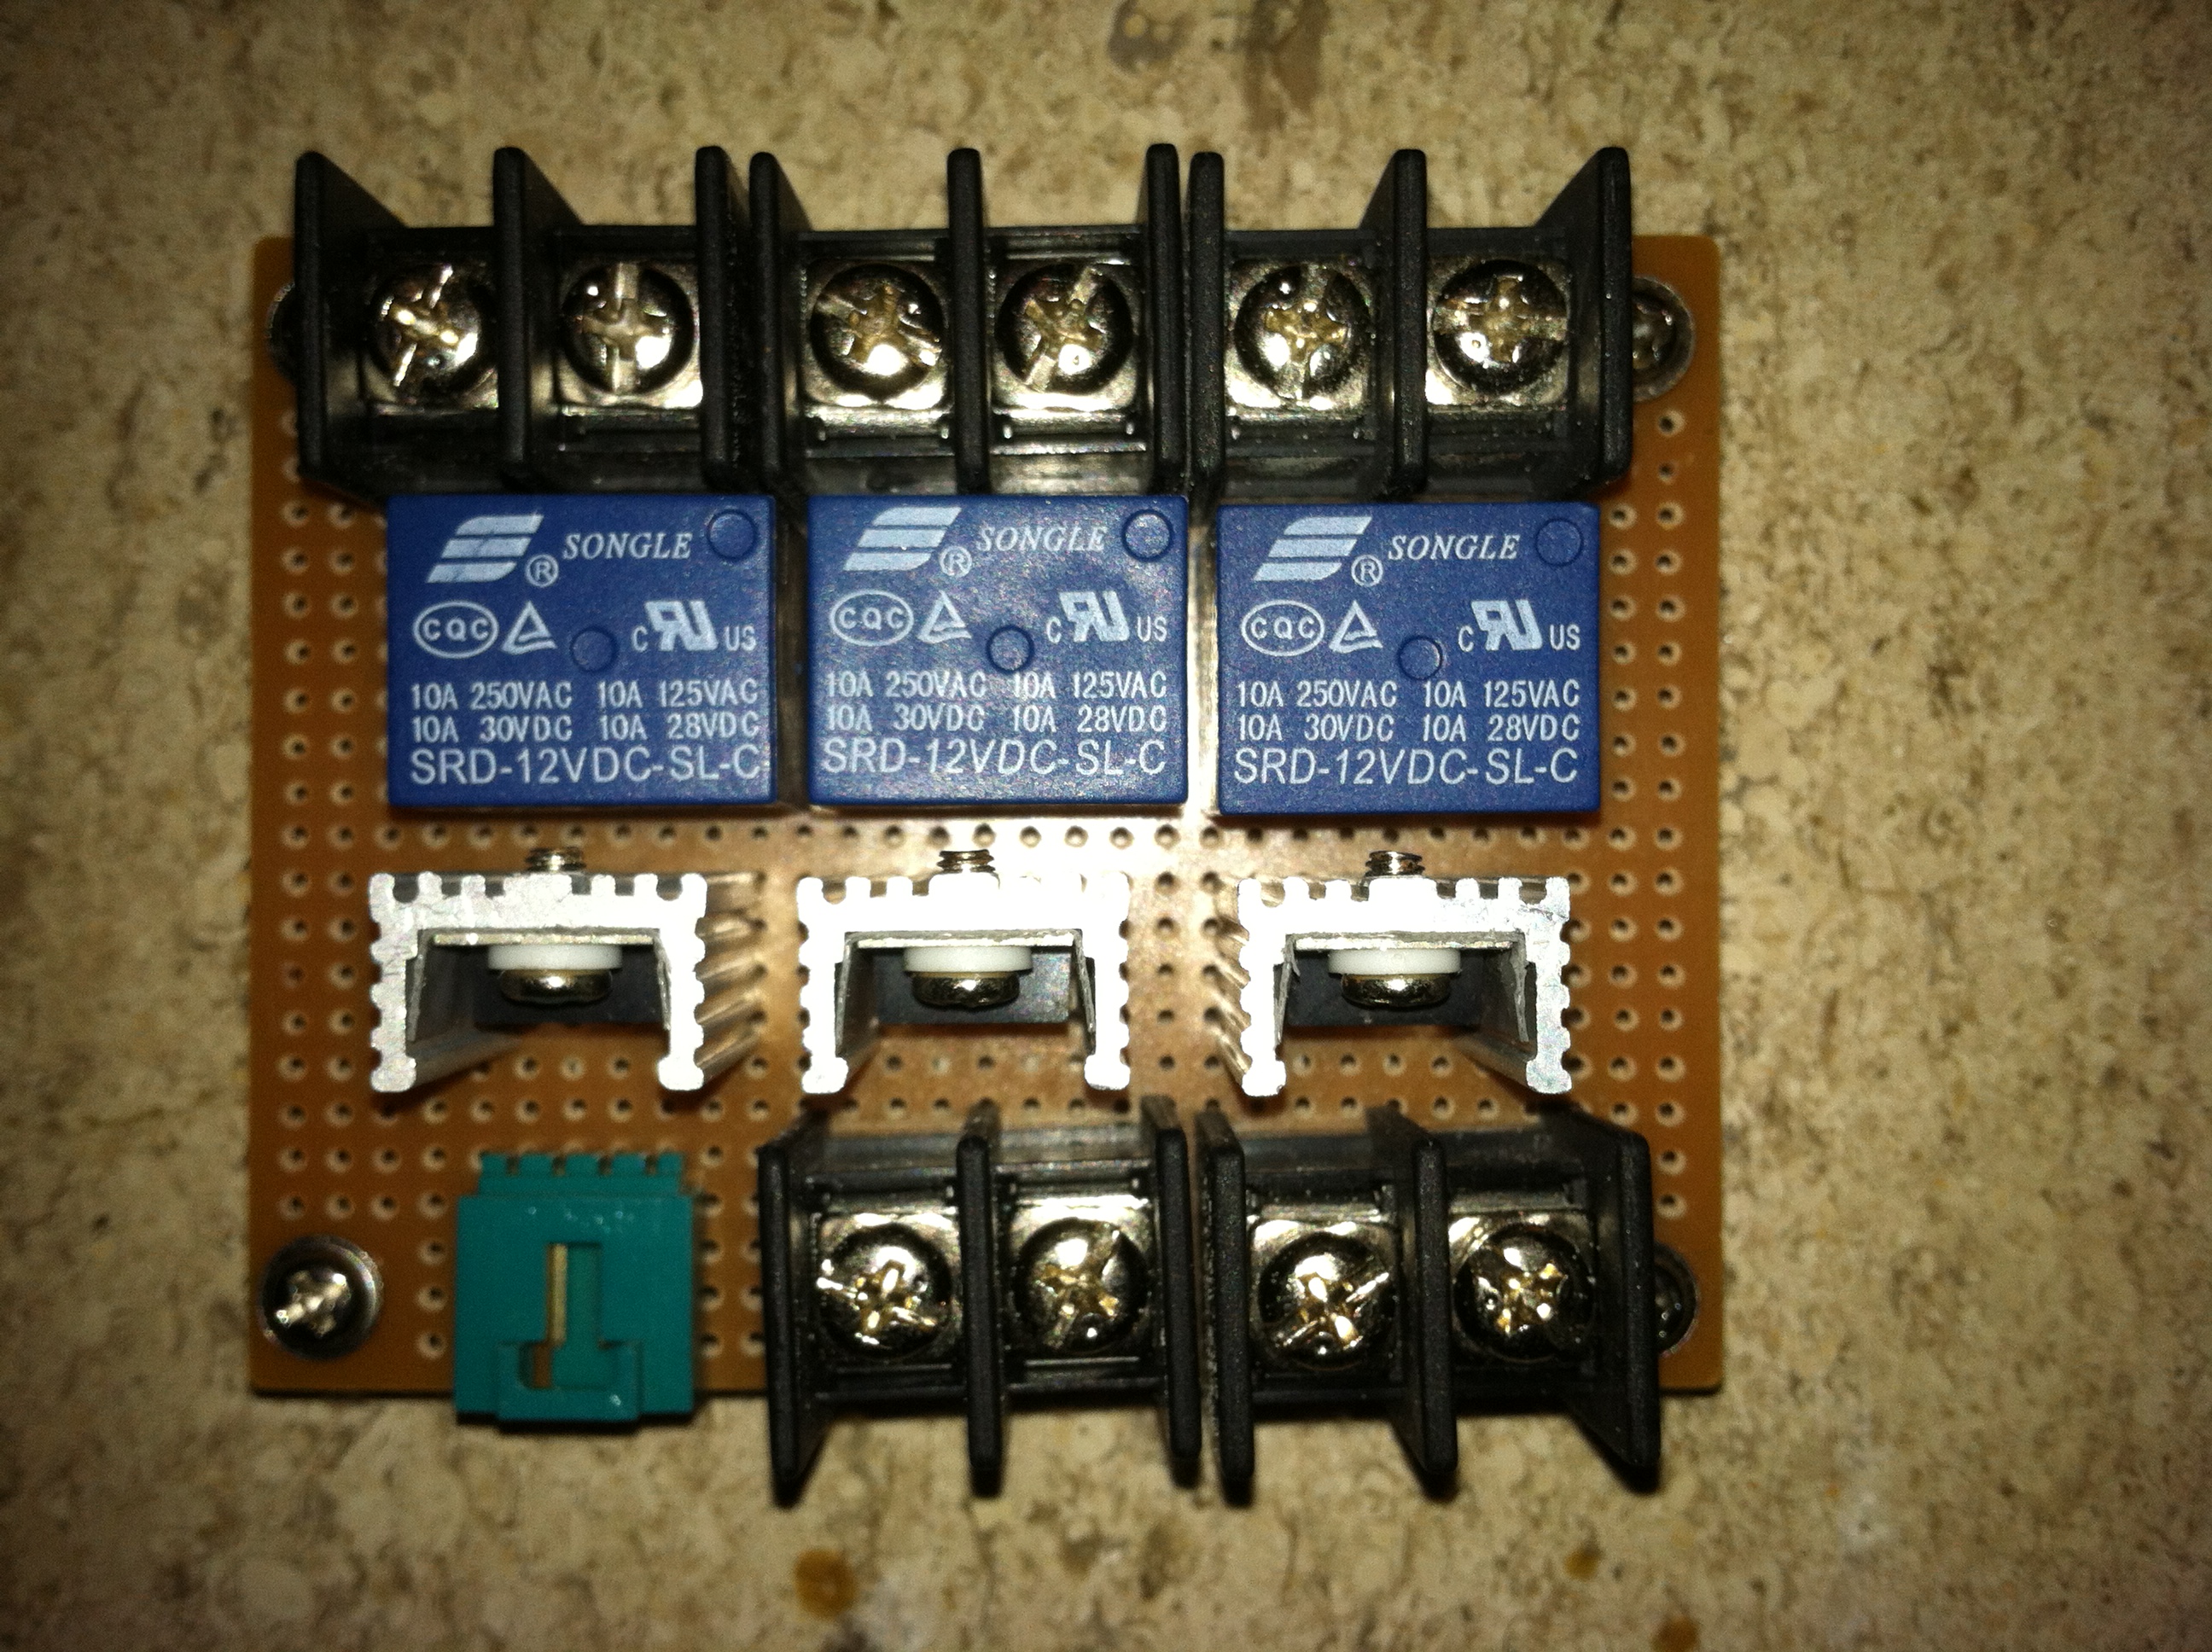

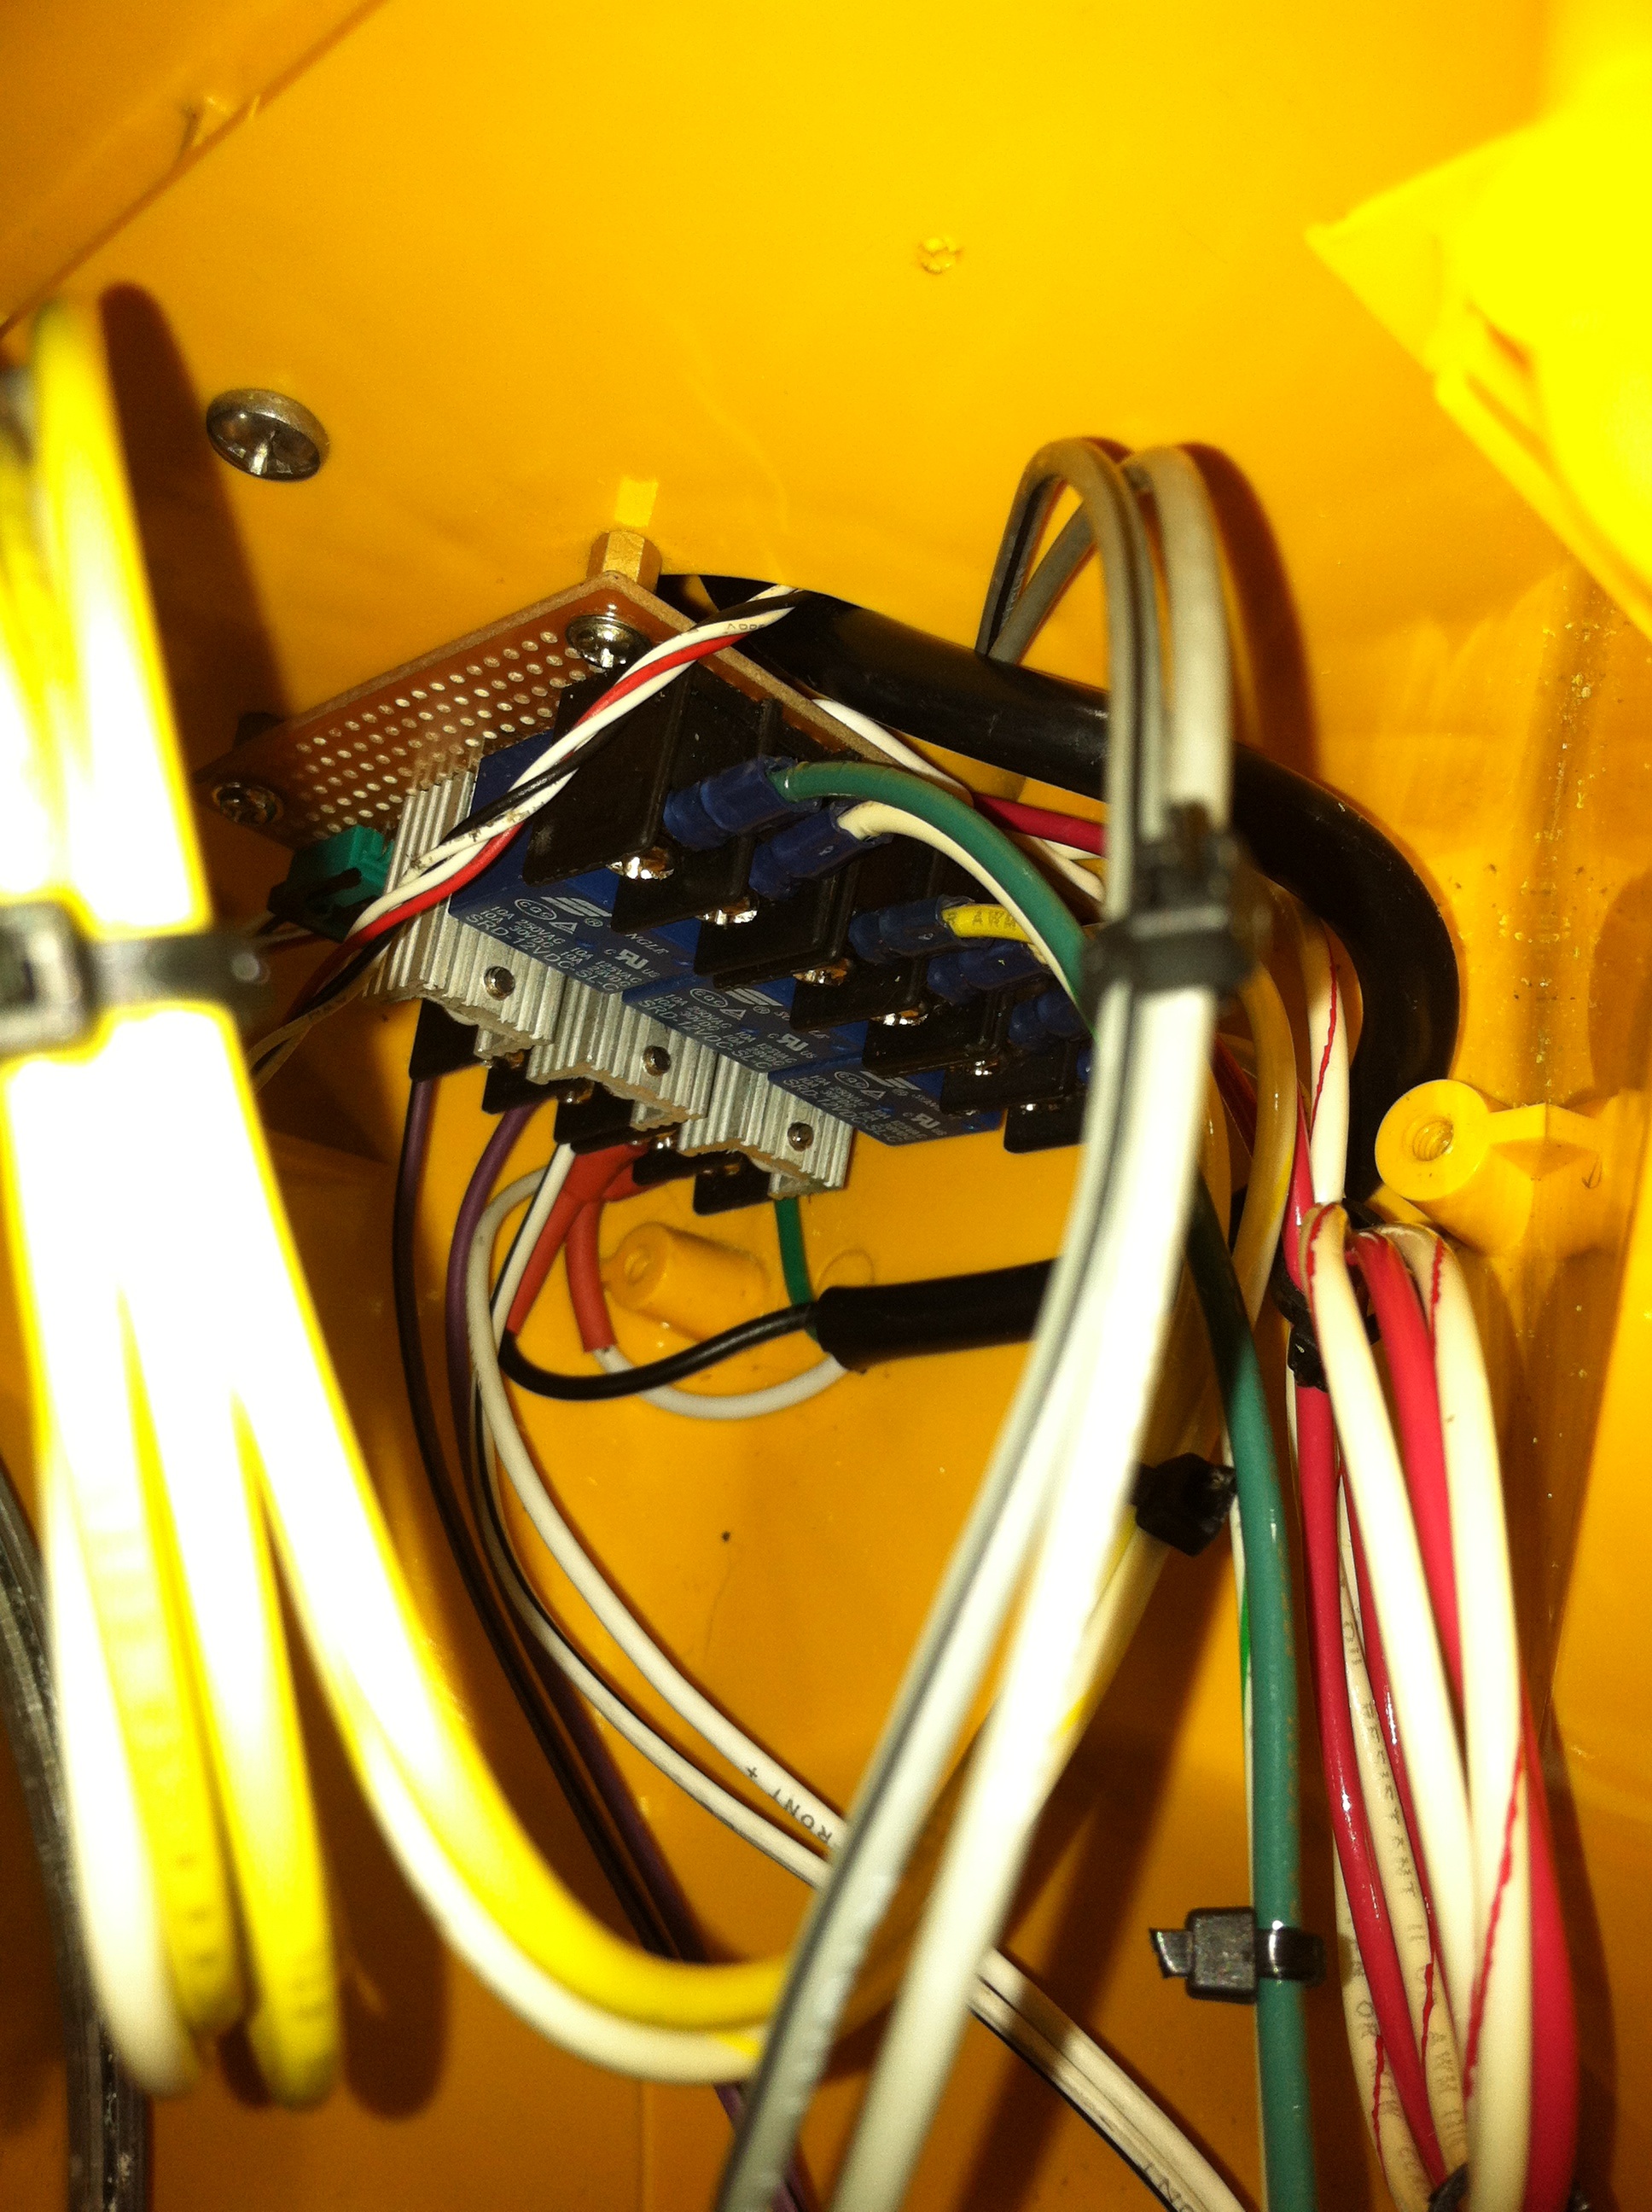
The Relay Board is the interface between the Arduino’s Digital Outputs and the Lamps inside the physical traffic signal. Since the Arduino can only sink 5 volts at a very low current it is necessary to use a power transistor (black things with the silver heatsinks) in combination with the relay (blue rectangle). The flow model is Arduino->Transistor->Relay->Lamp, the board interfaces with the Arduino using 4 pins Relay1(green), Relay2(yellow), Relay3(red), Ground.
WiShield
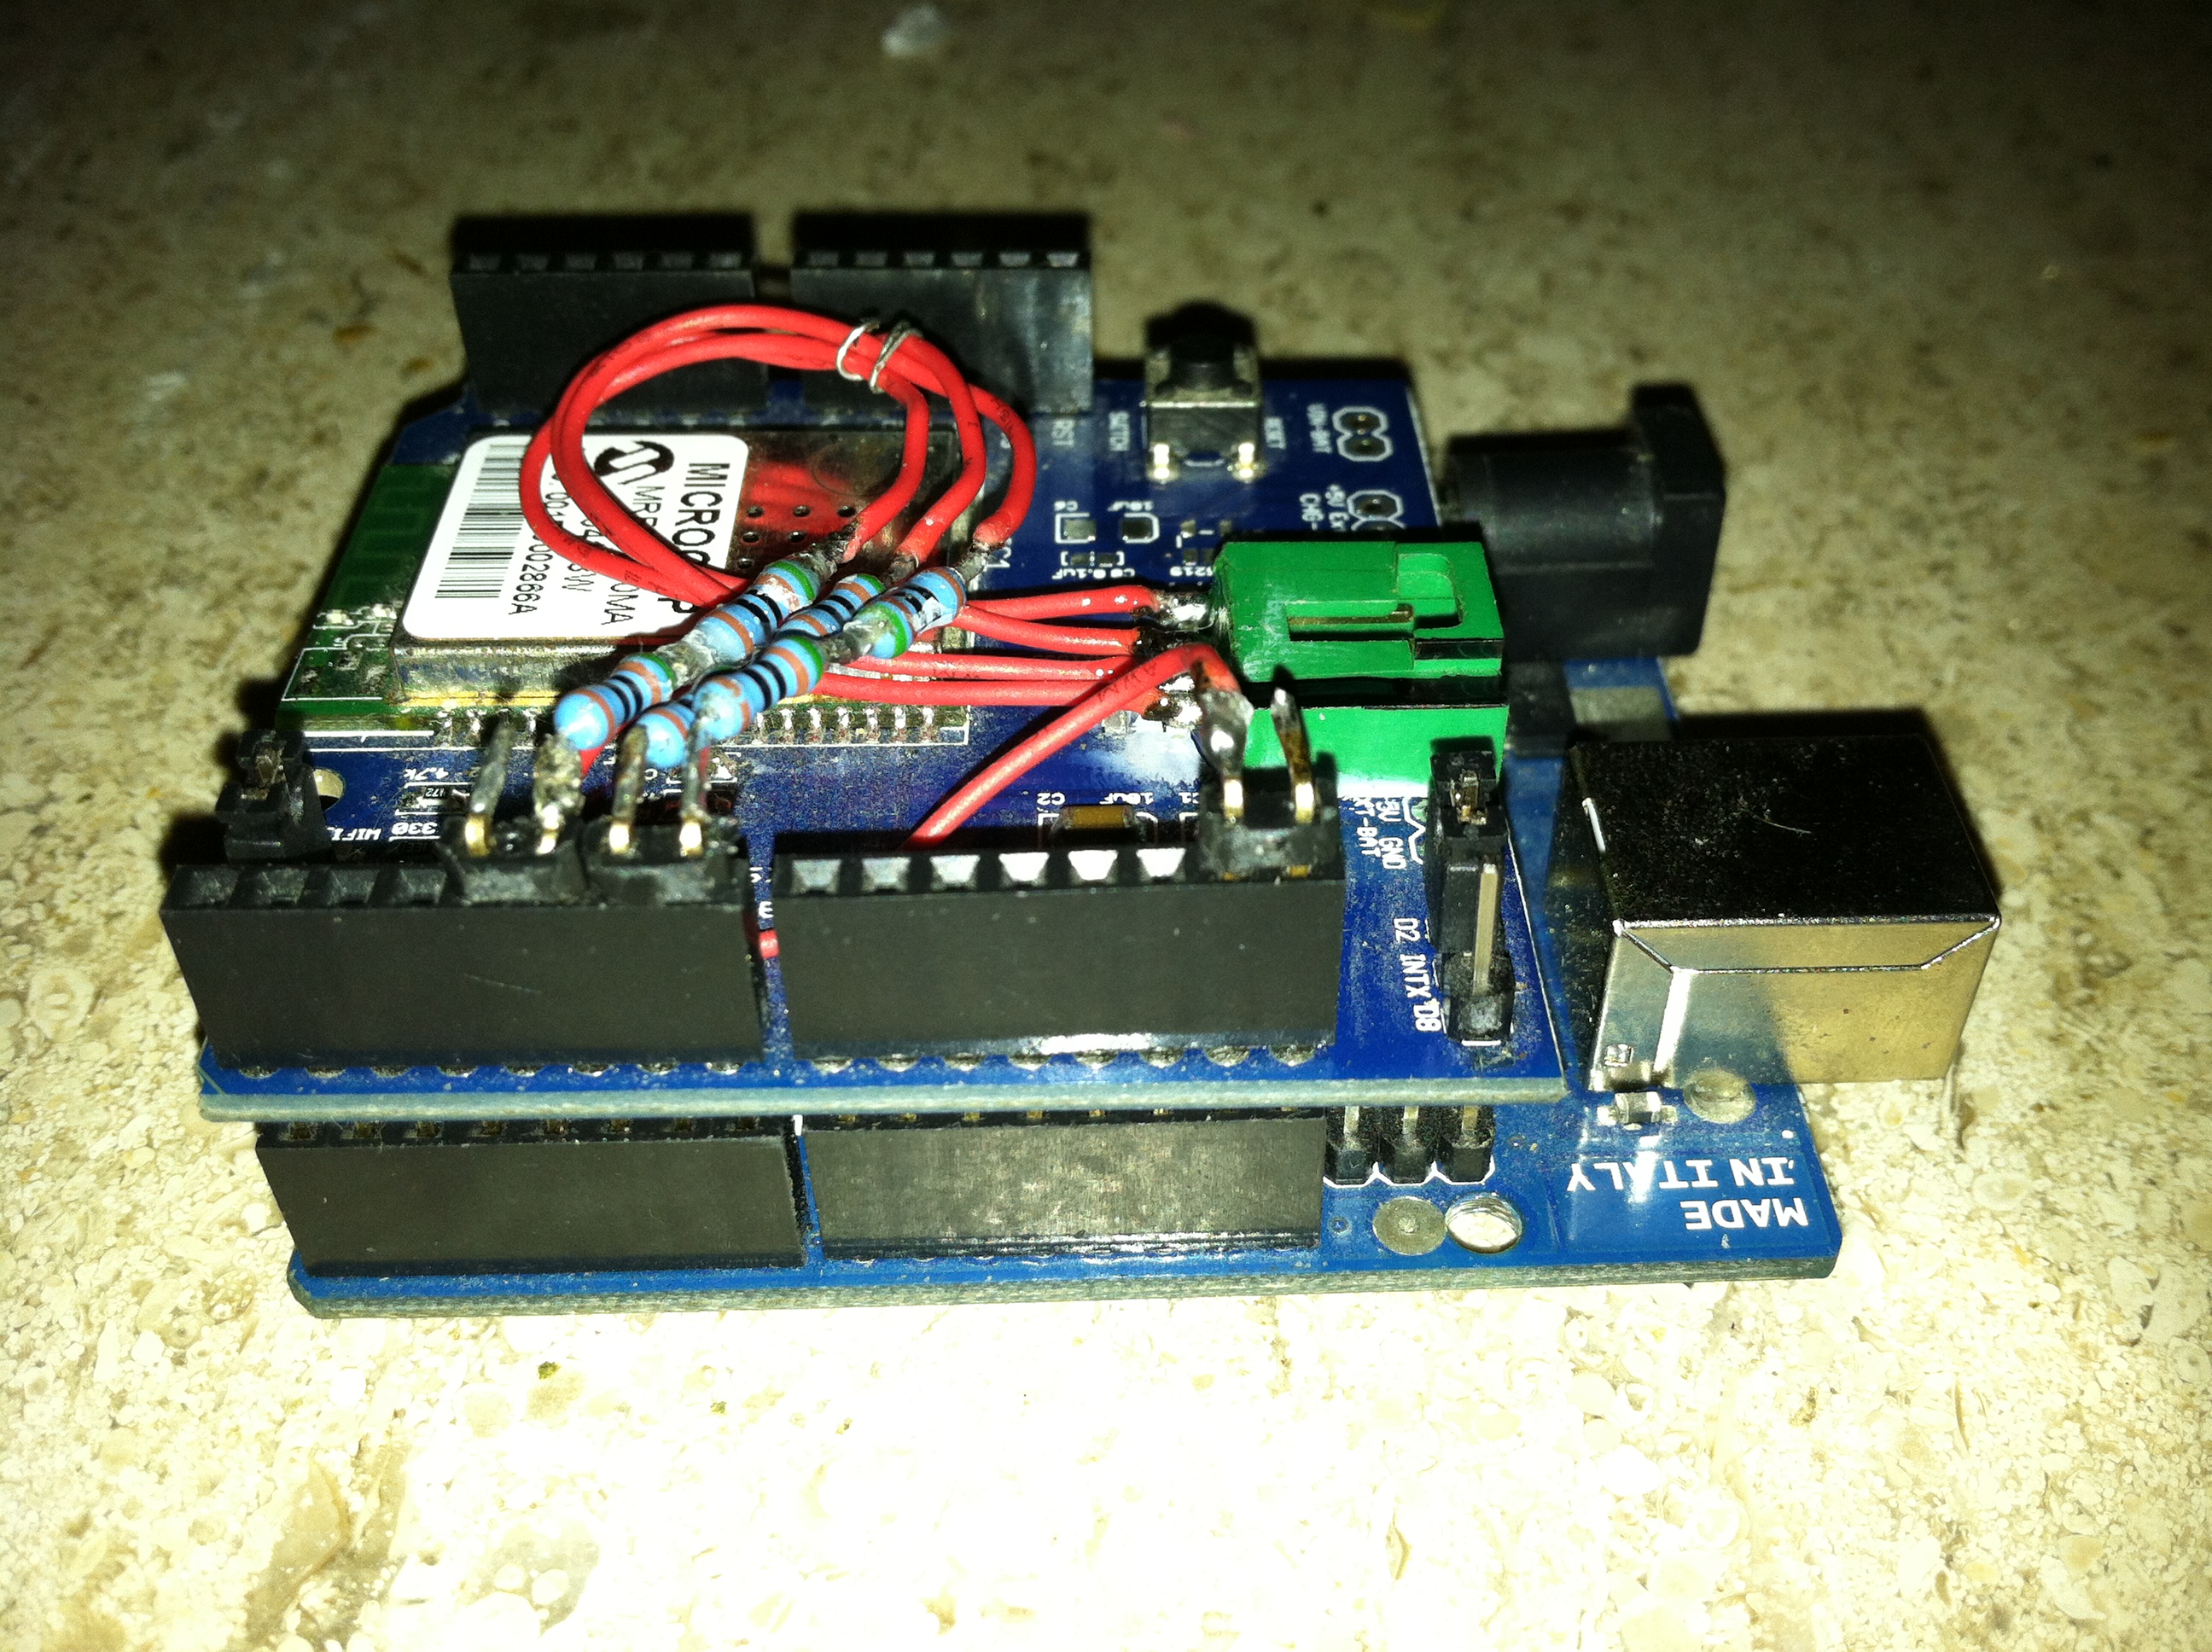
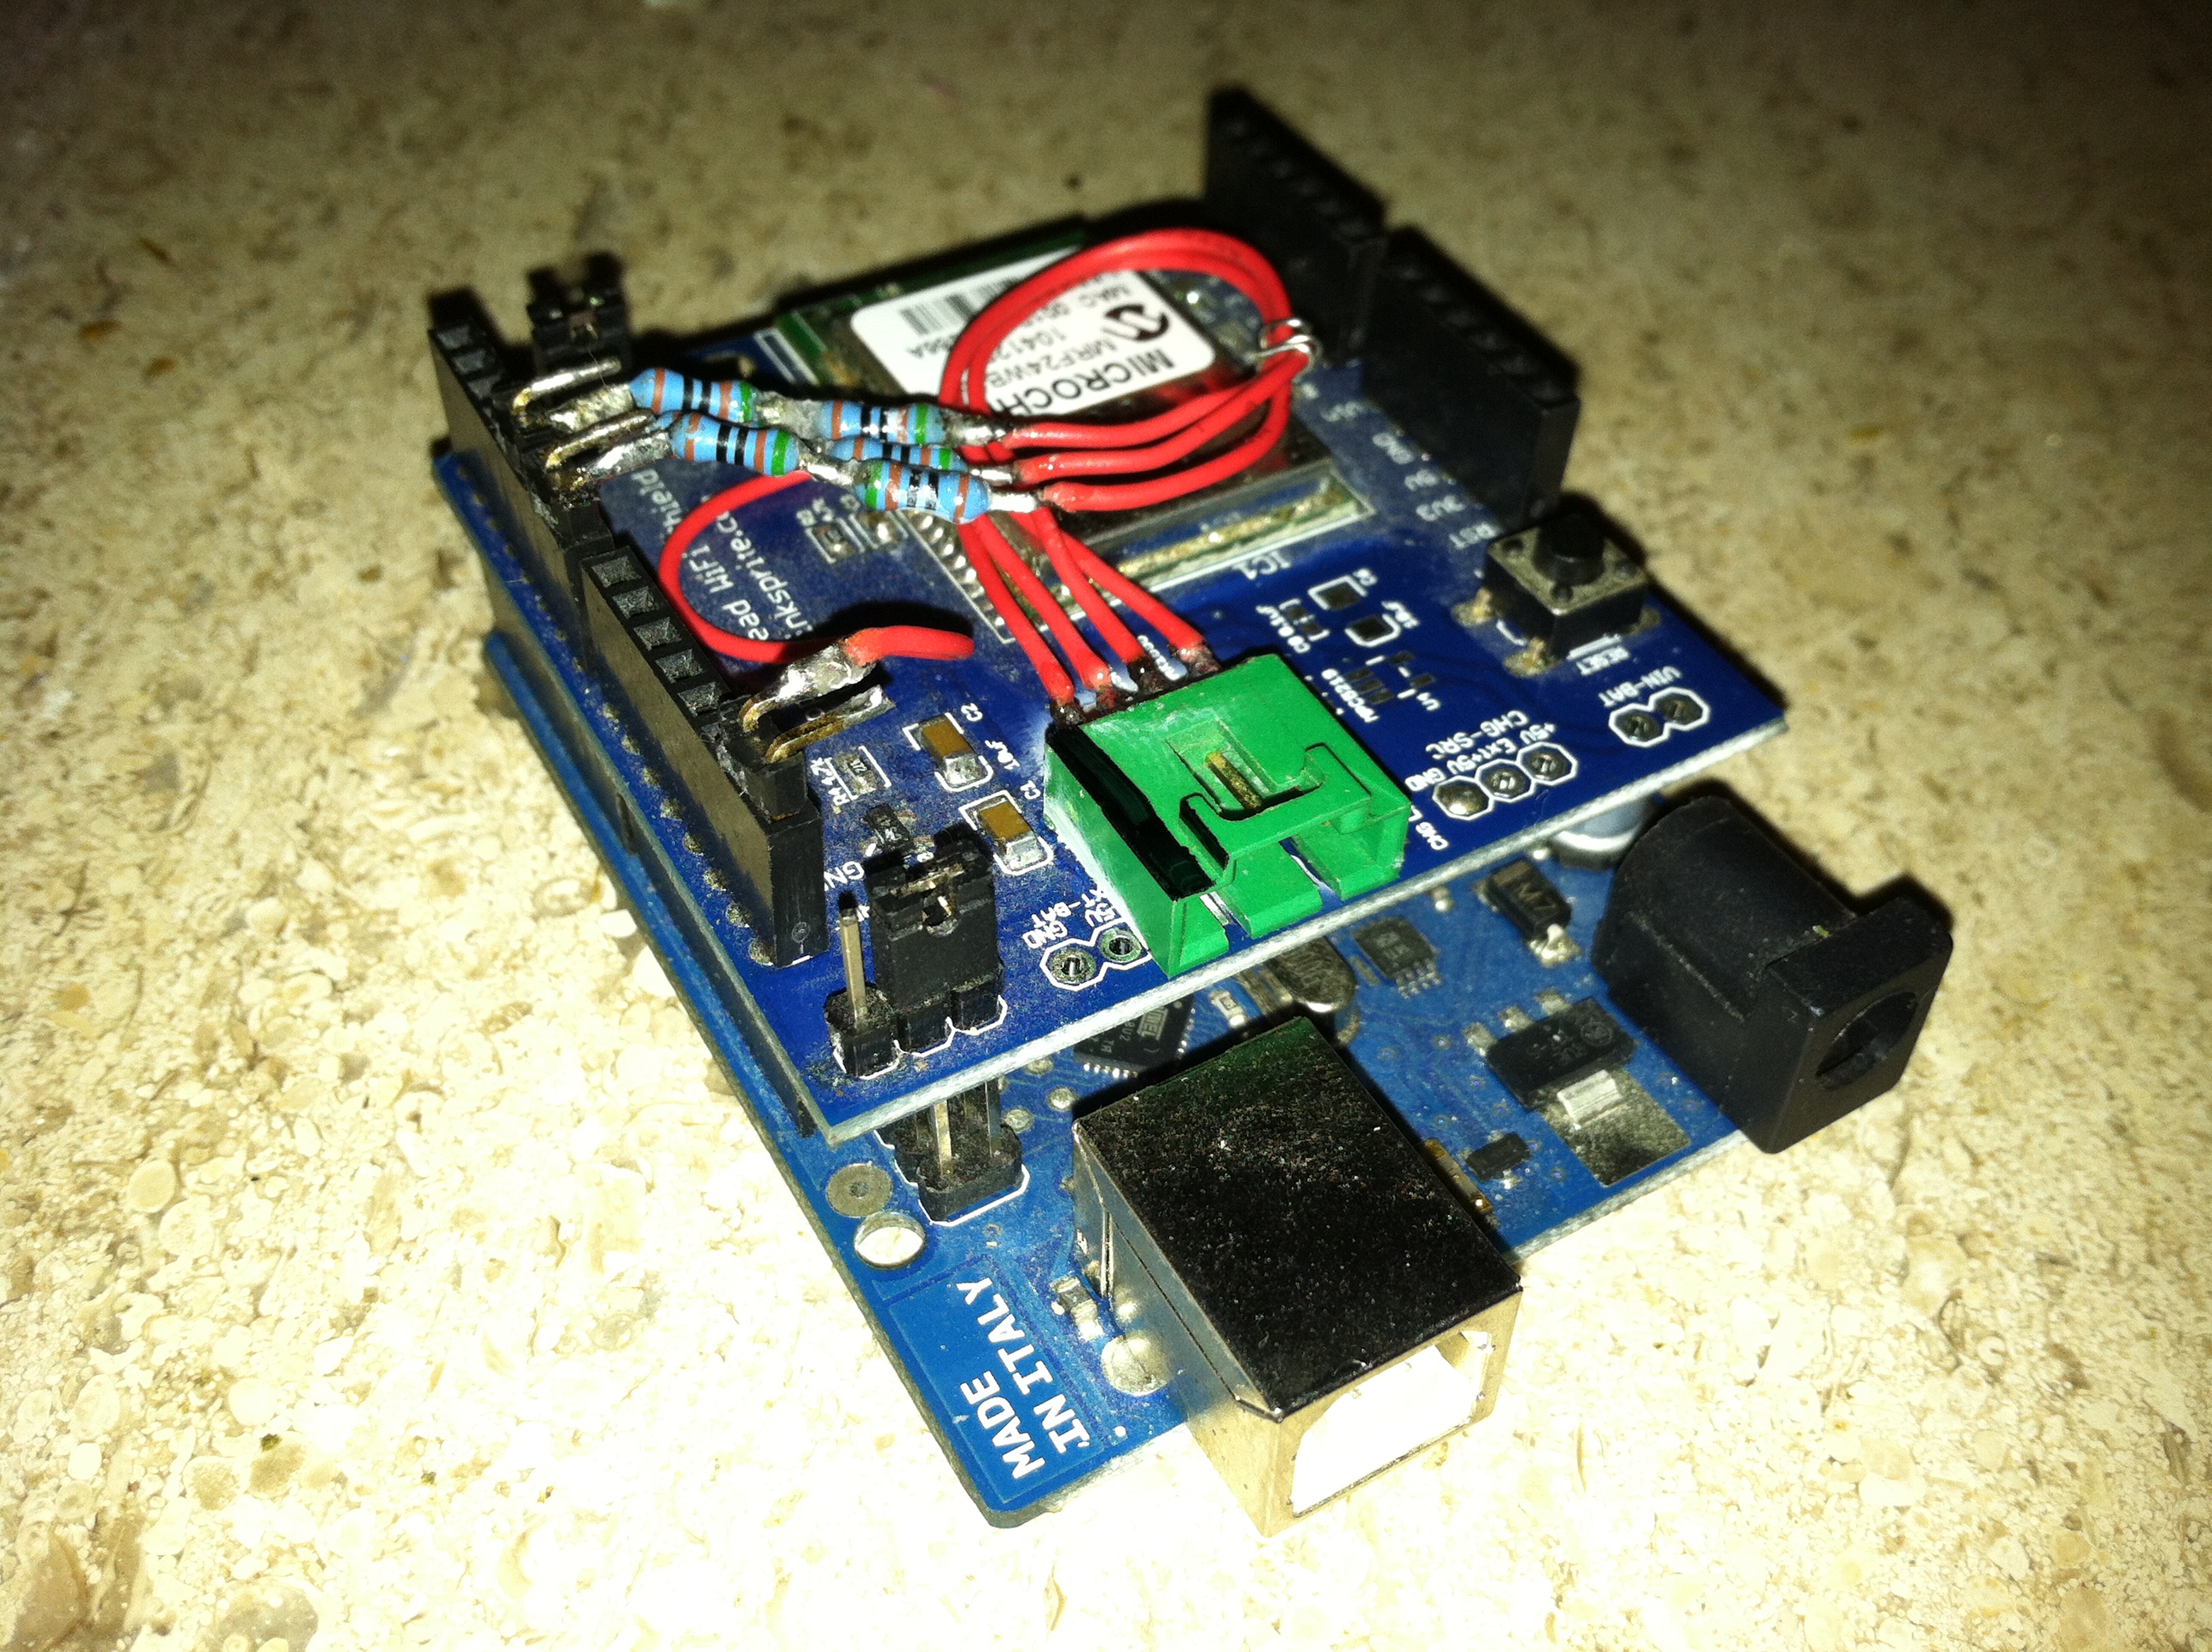
The Copperhead WiShield utilizes a Microchip MRF24WB0MA 802.11b wireless controller which interfaces over SPI with the Arduino. The Arduino’s design makes stacking shields (daughter boards) on top of the Arduino platform, eliminating the need to solder wires or even use a breadboard to build many simple projects. Here I utilize the shield due to many factors, including the need to retain USB for the Arduino. The $55 asking price for the shield is somewhat steep however compared to sourcing this controller, developing an interface board, etching, soldering the surface mount controller the asking price is quite reasonable and should come down in the future.
Interconnect

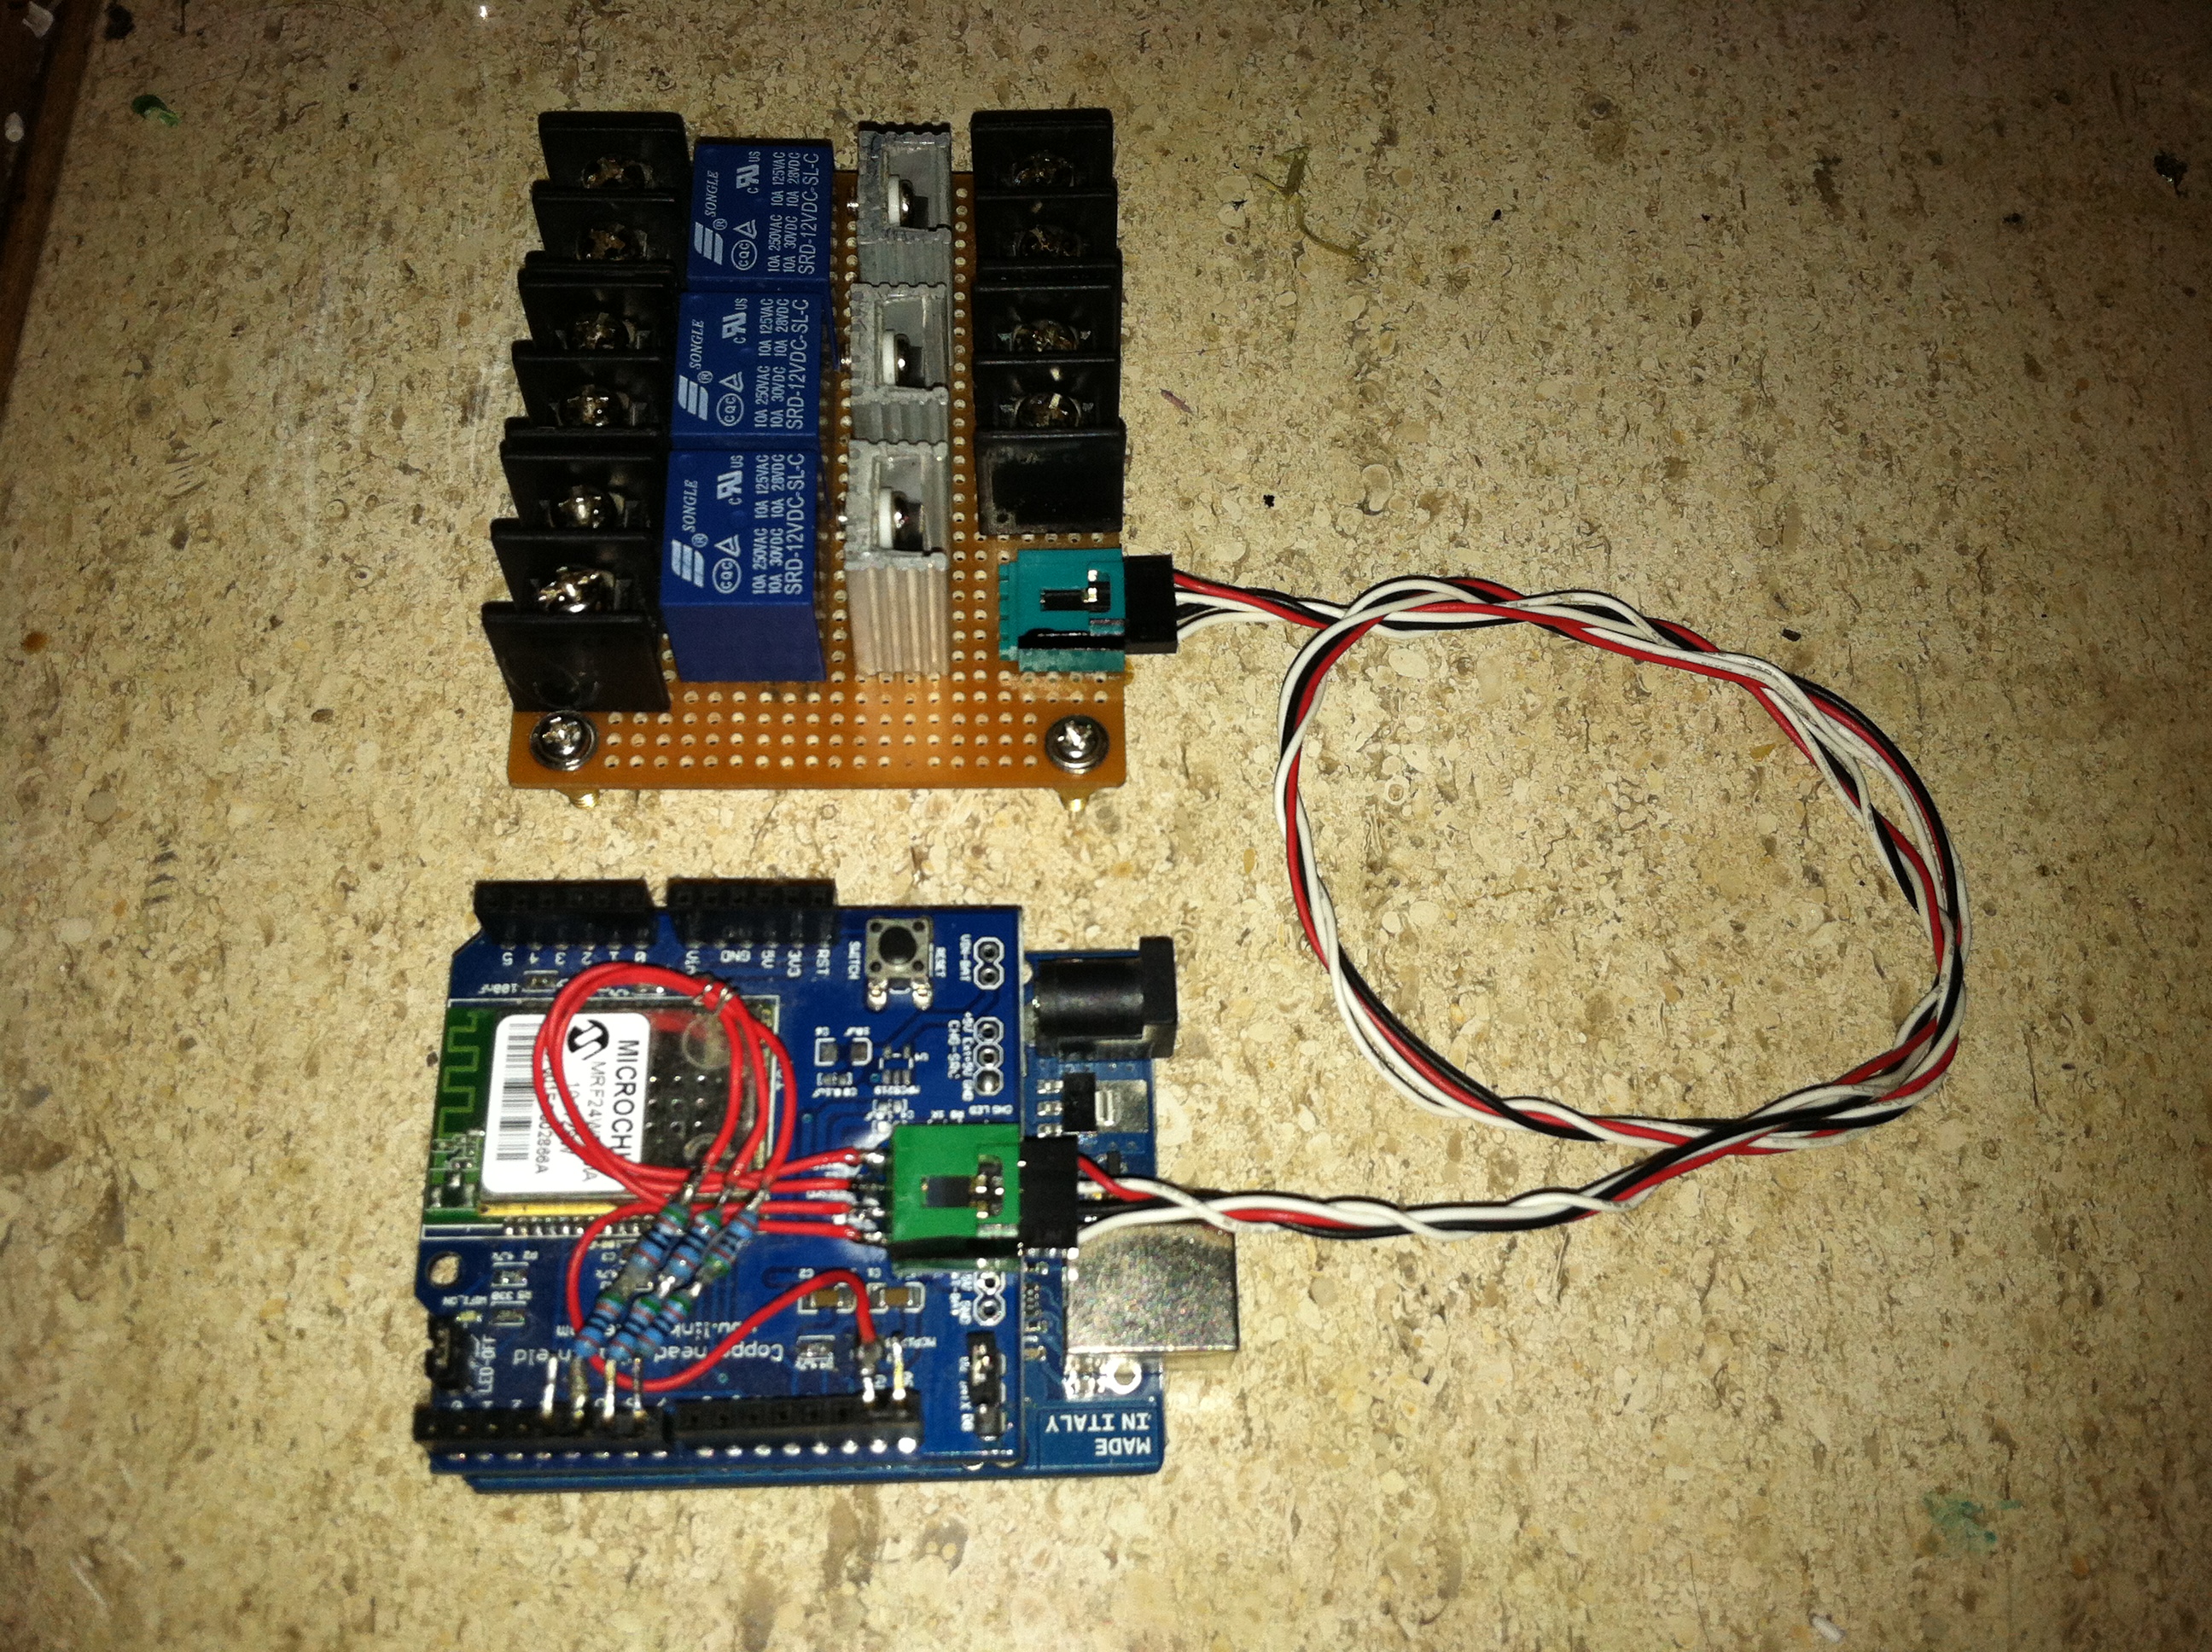
The Relay Board connects to the Arduino+WiShield by use of a small interconnect cable salvaged from an old computer. A mating header glued to the WiShield connects to the 3 Digital Outputs that control the Lamps and a ground. The same header is on the Relay Board with pin 1 being marked with a black stripe on the top of the connector. This keeps the project completely modular allowing the possibility to use a completely different micro-controller or power controller without having to swap out the other.
Internal Web Page
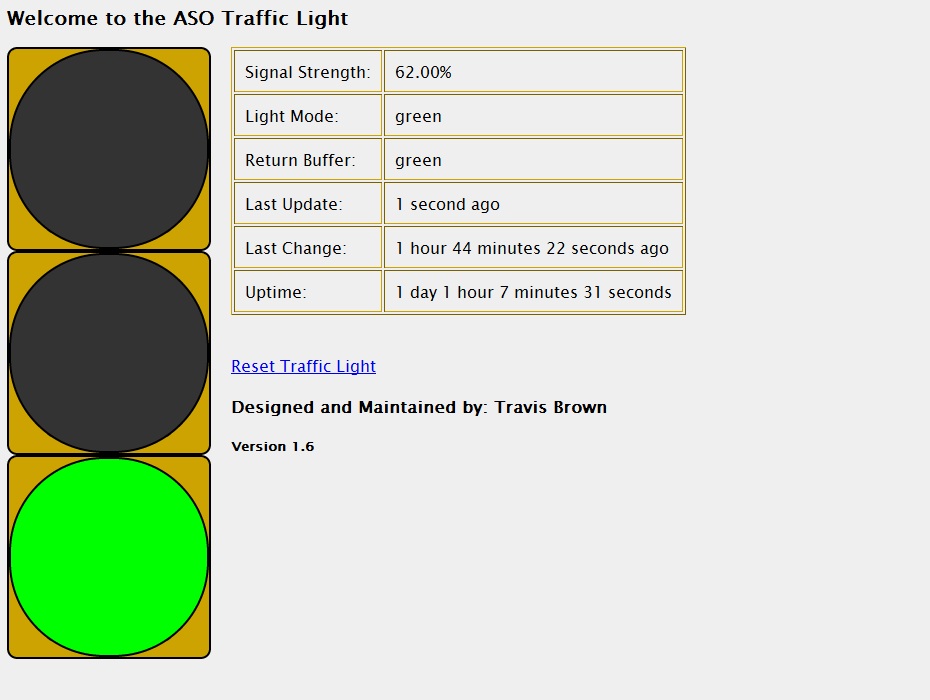

The WiServer library is capable of serving web pages and content as well as downloading content. Here I utilize this to create a status web page that can be viewed remotely to check debug values, uptime, buffer etc.. The data is refreshed every 10 seconds using jQuery Ajax, a switch is put in the sendPage() function (detailed in the code section) to output a json encoded array of values from the Arduino.
Traffic Light
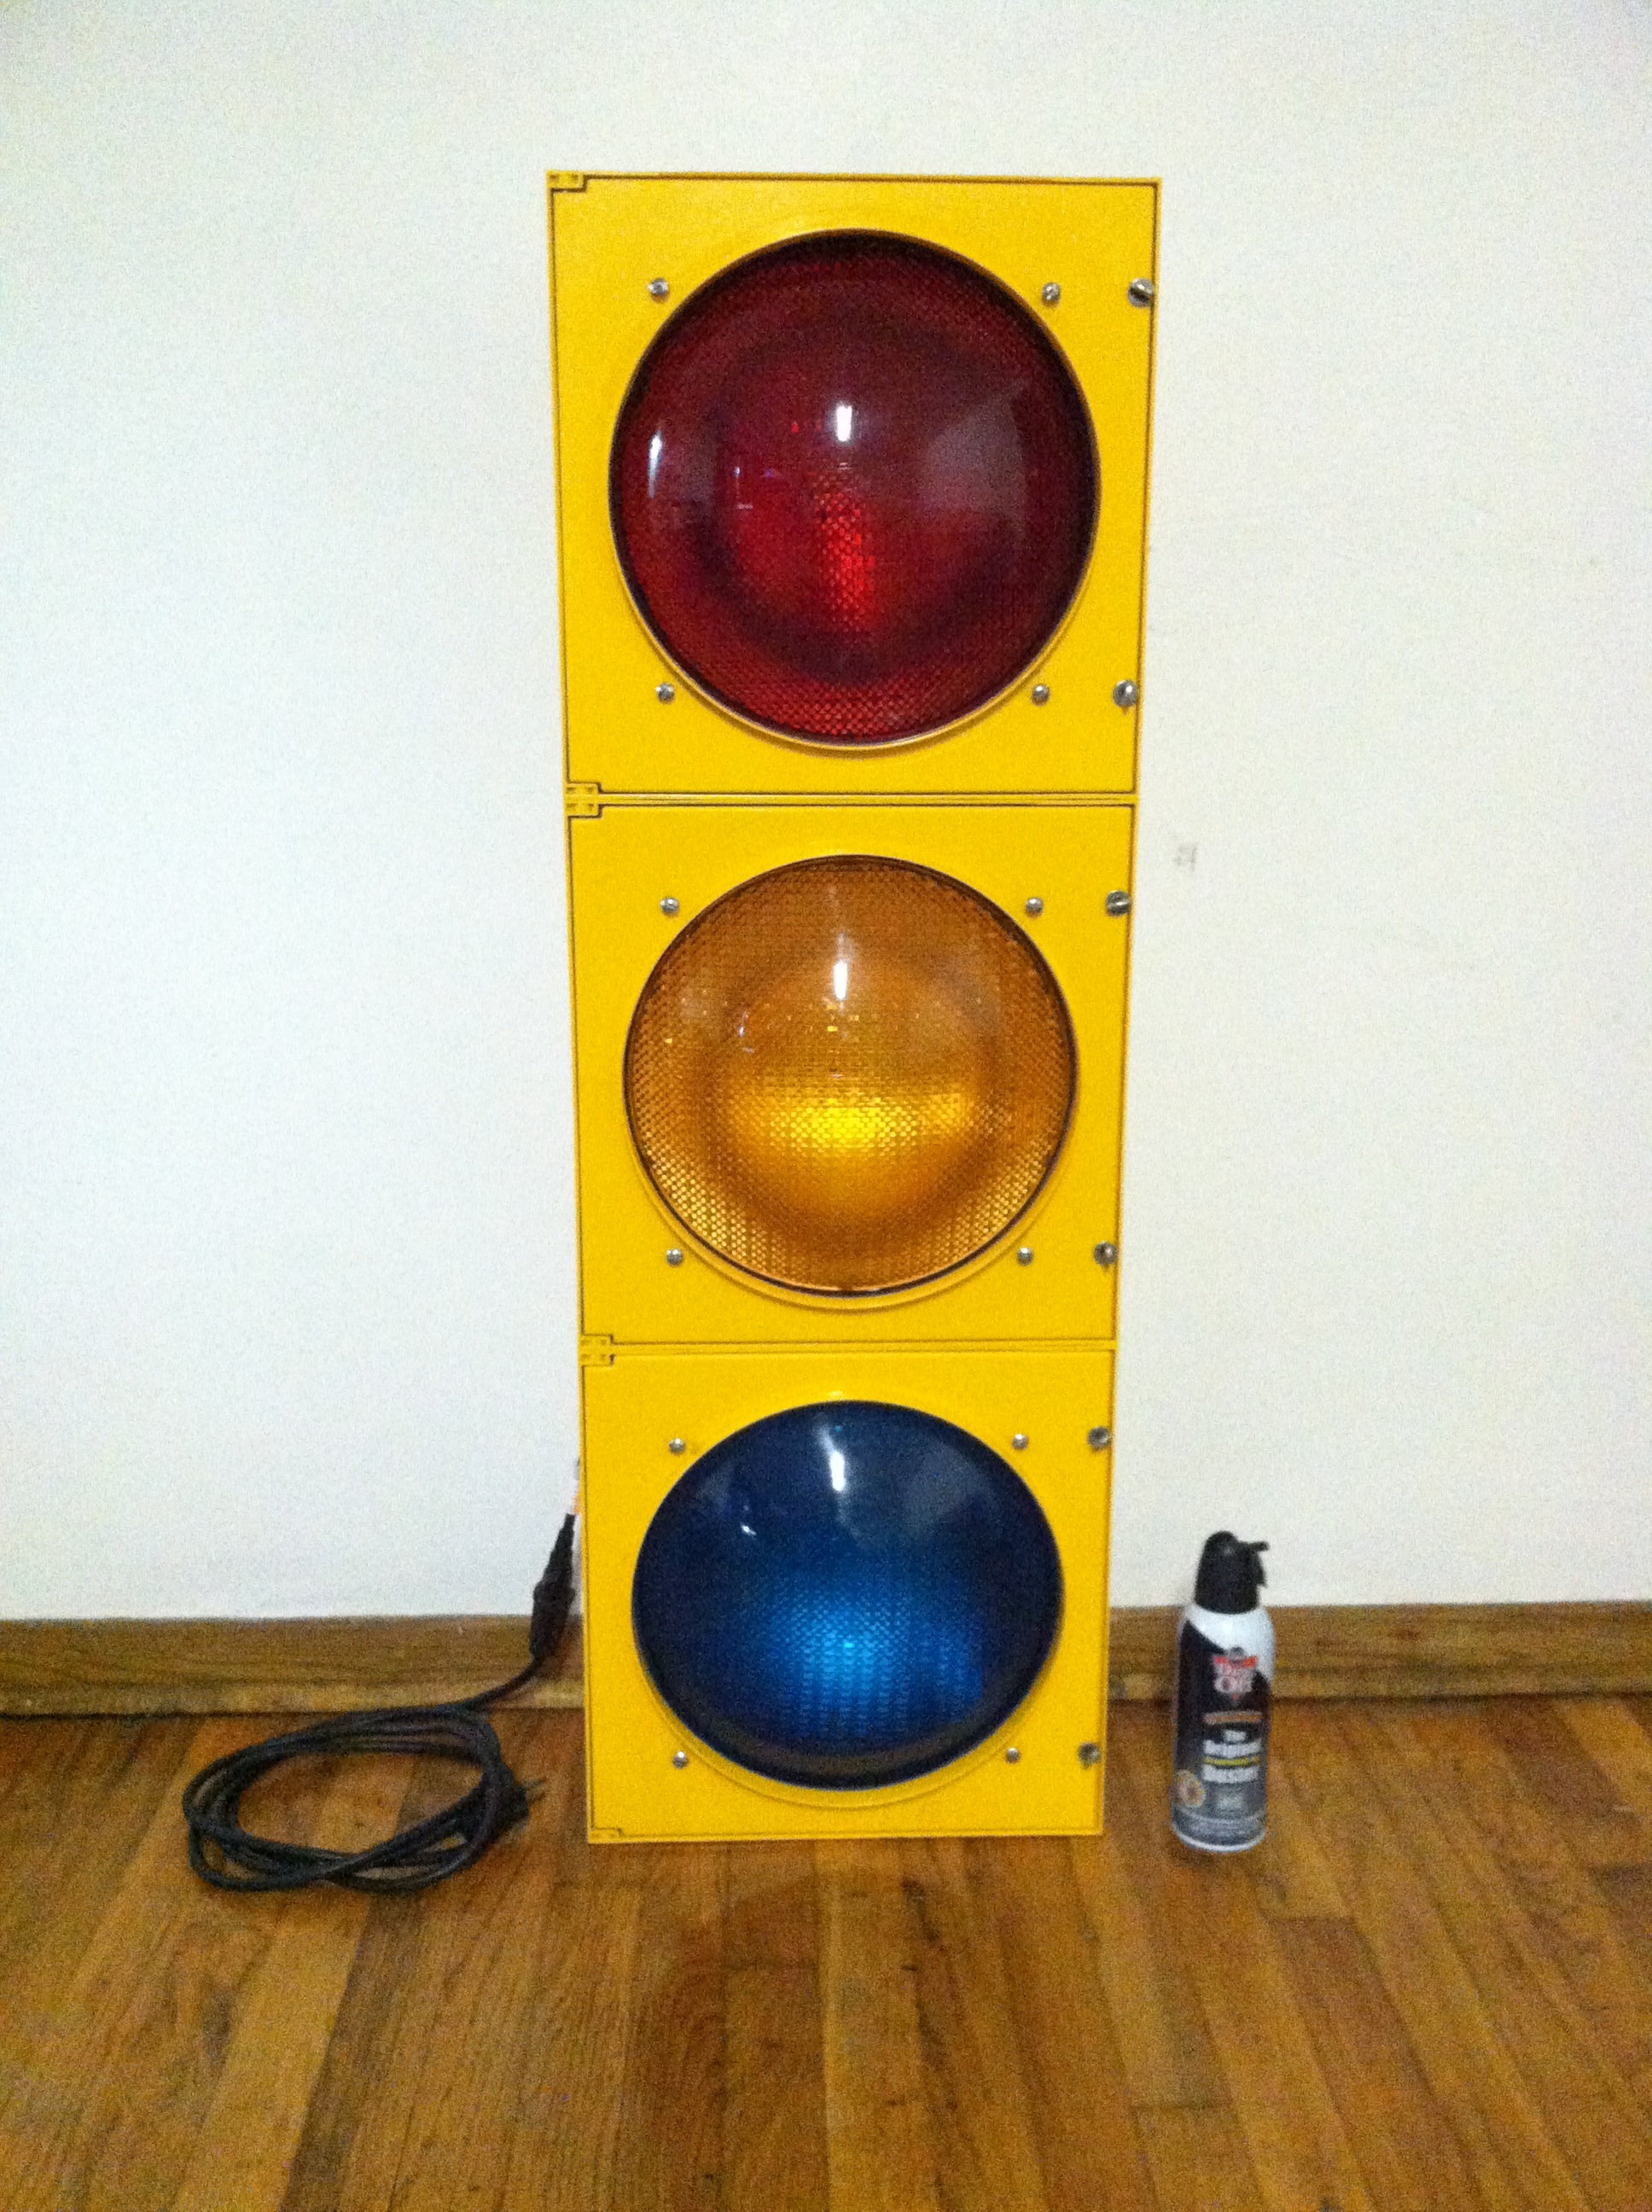
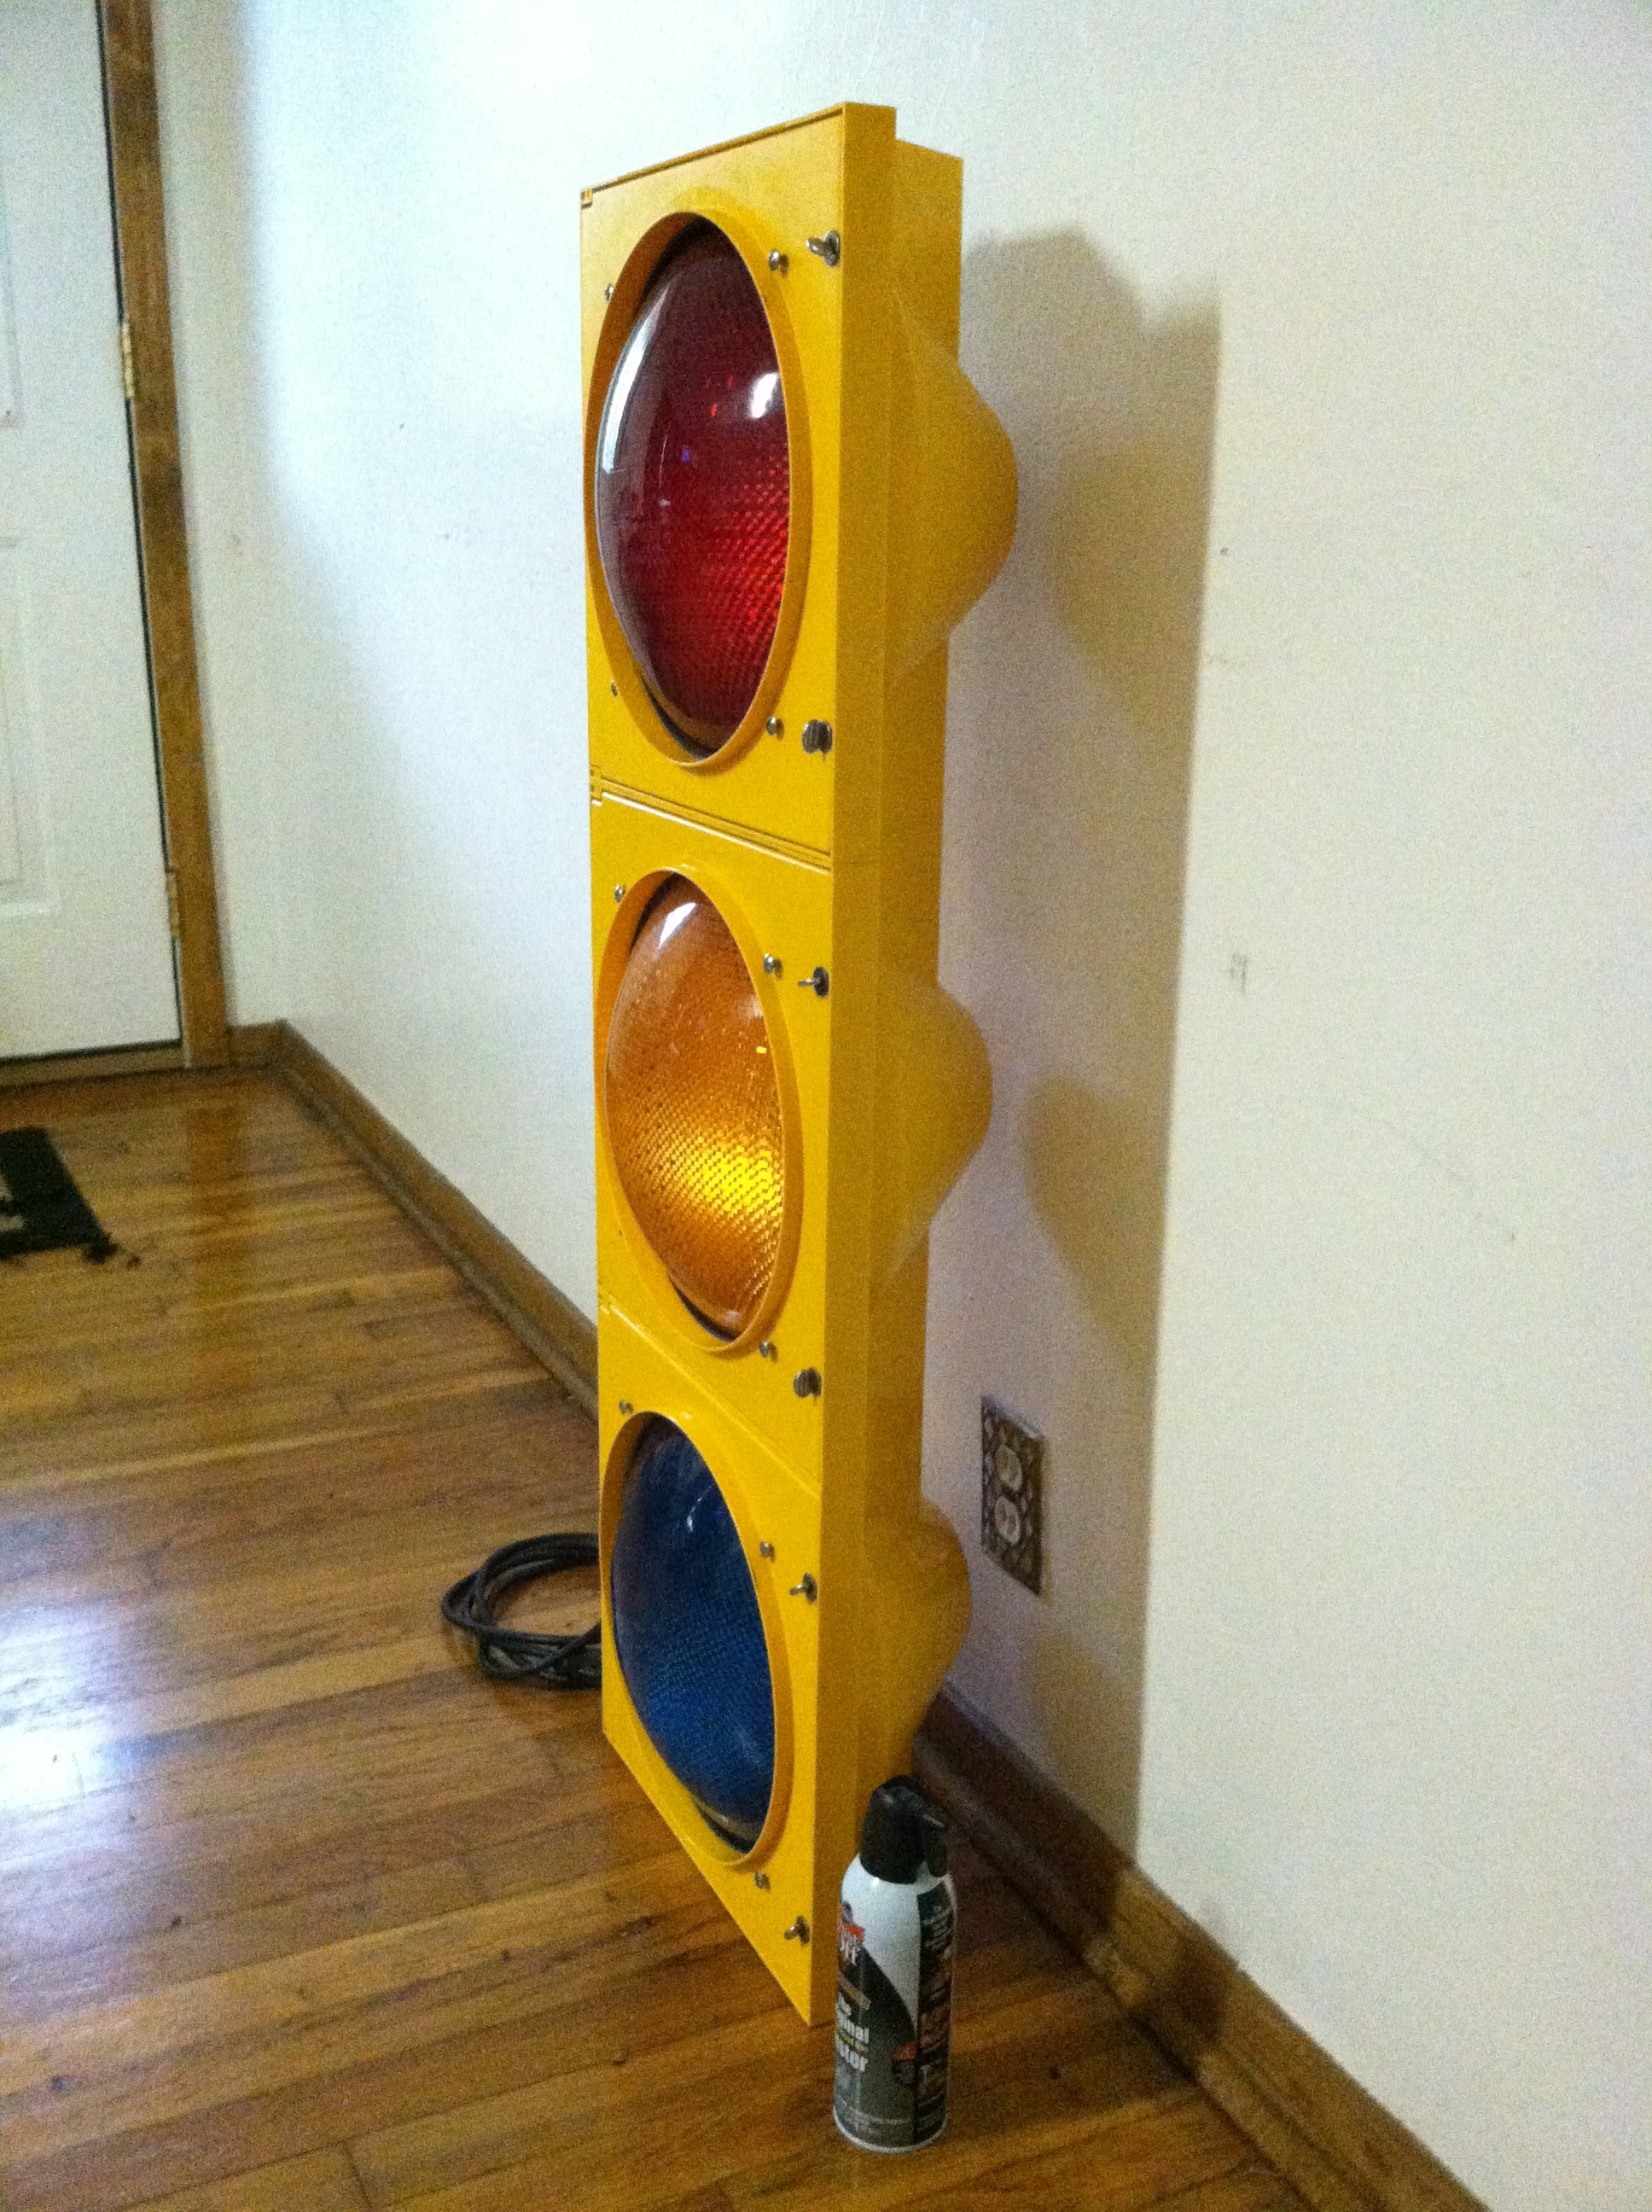
The stunning traffic light above is manufactured by Durasig measuring 42 inches tall, 14 inches wide, and 8 inches deep. The light is brand new and unhung which means no sanding, repainting, etc.. It comes pre-wired with all the lamps on with a small terminal block that I removed as our Relay Board will be the new controller for this signal.

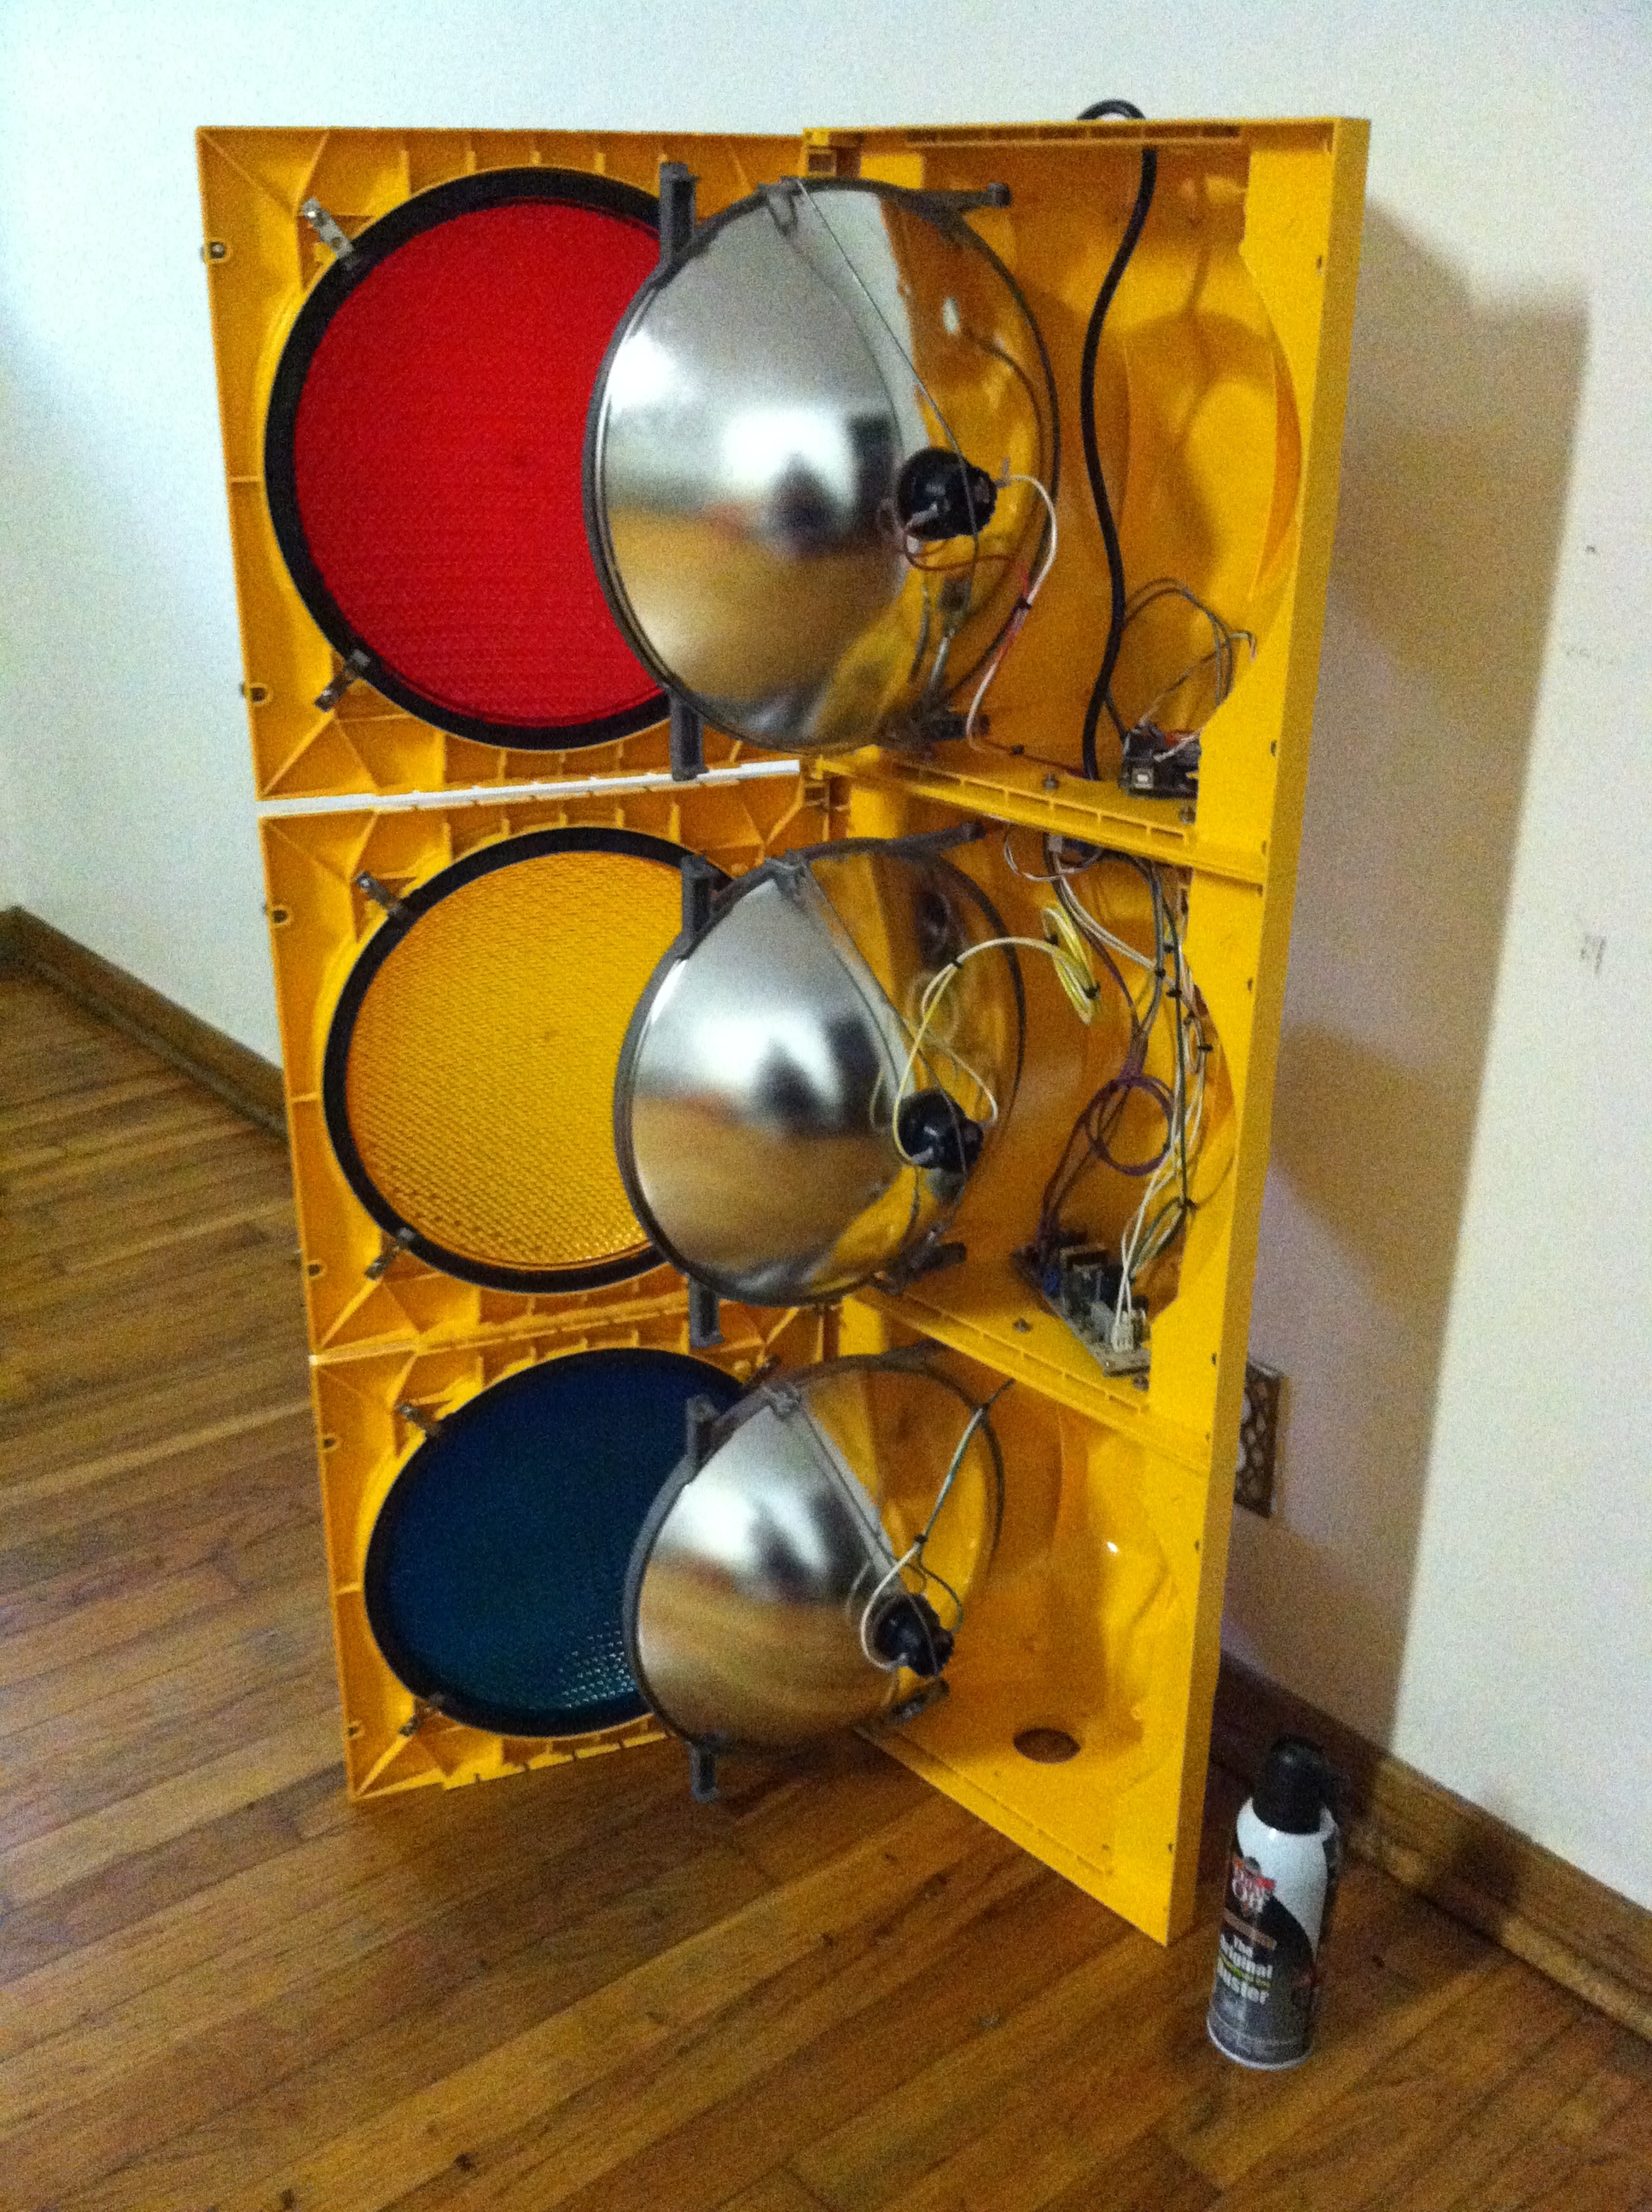
Showing the inner part of the light is designed such that the cover can be opened with two wing style thumb screws which reveals the lamps and reflector assembly. The reflectors swing forward allowing access to the wiring behind them.
Integration


In the top or red section of the traffic light is where the Arduino and WiShield are mounted. Care was taken to ensure easy access to the Arduino’s USB port for future updates to the code, only the red section’s lens cover needs to be opened with the two wing style thumb screws and plug in your USB cable. Thanks to the circuit isolation that the Arduino provides it is possible to reprogram the traffic light without removing the AC power.

The middle or yellow section contains the Relay Board and a Power Supply which provides power for the Relay Board and the Arduino. The Power Supply was designed for use in a dual external hard drive enclosure and provides +5v and +12v regulated outputs.
Glory Shots
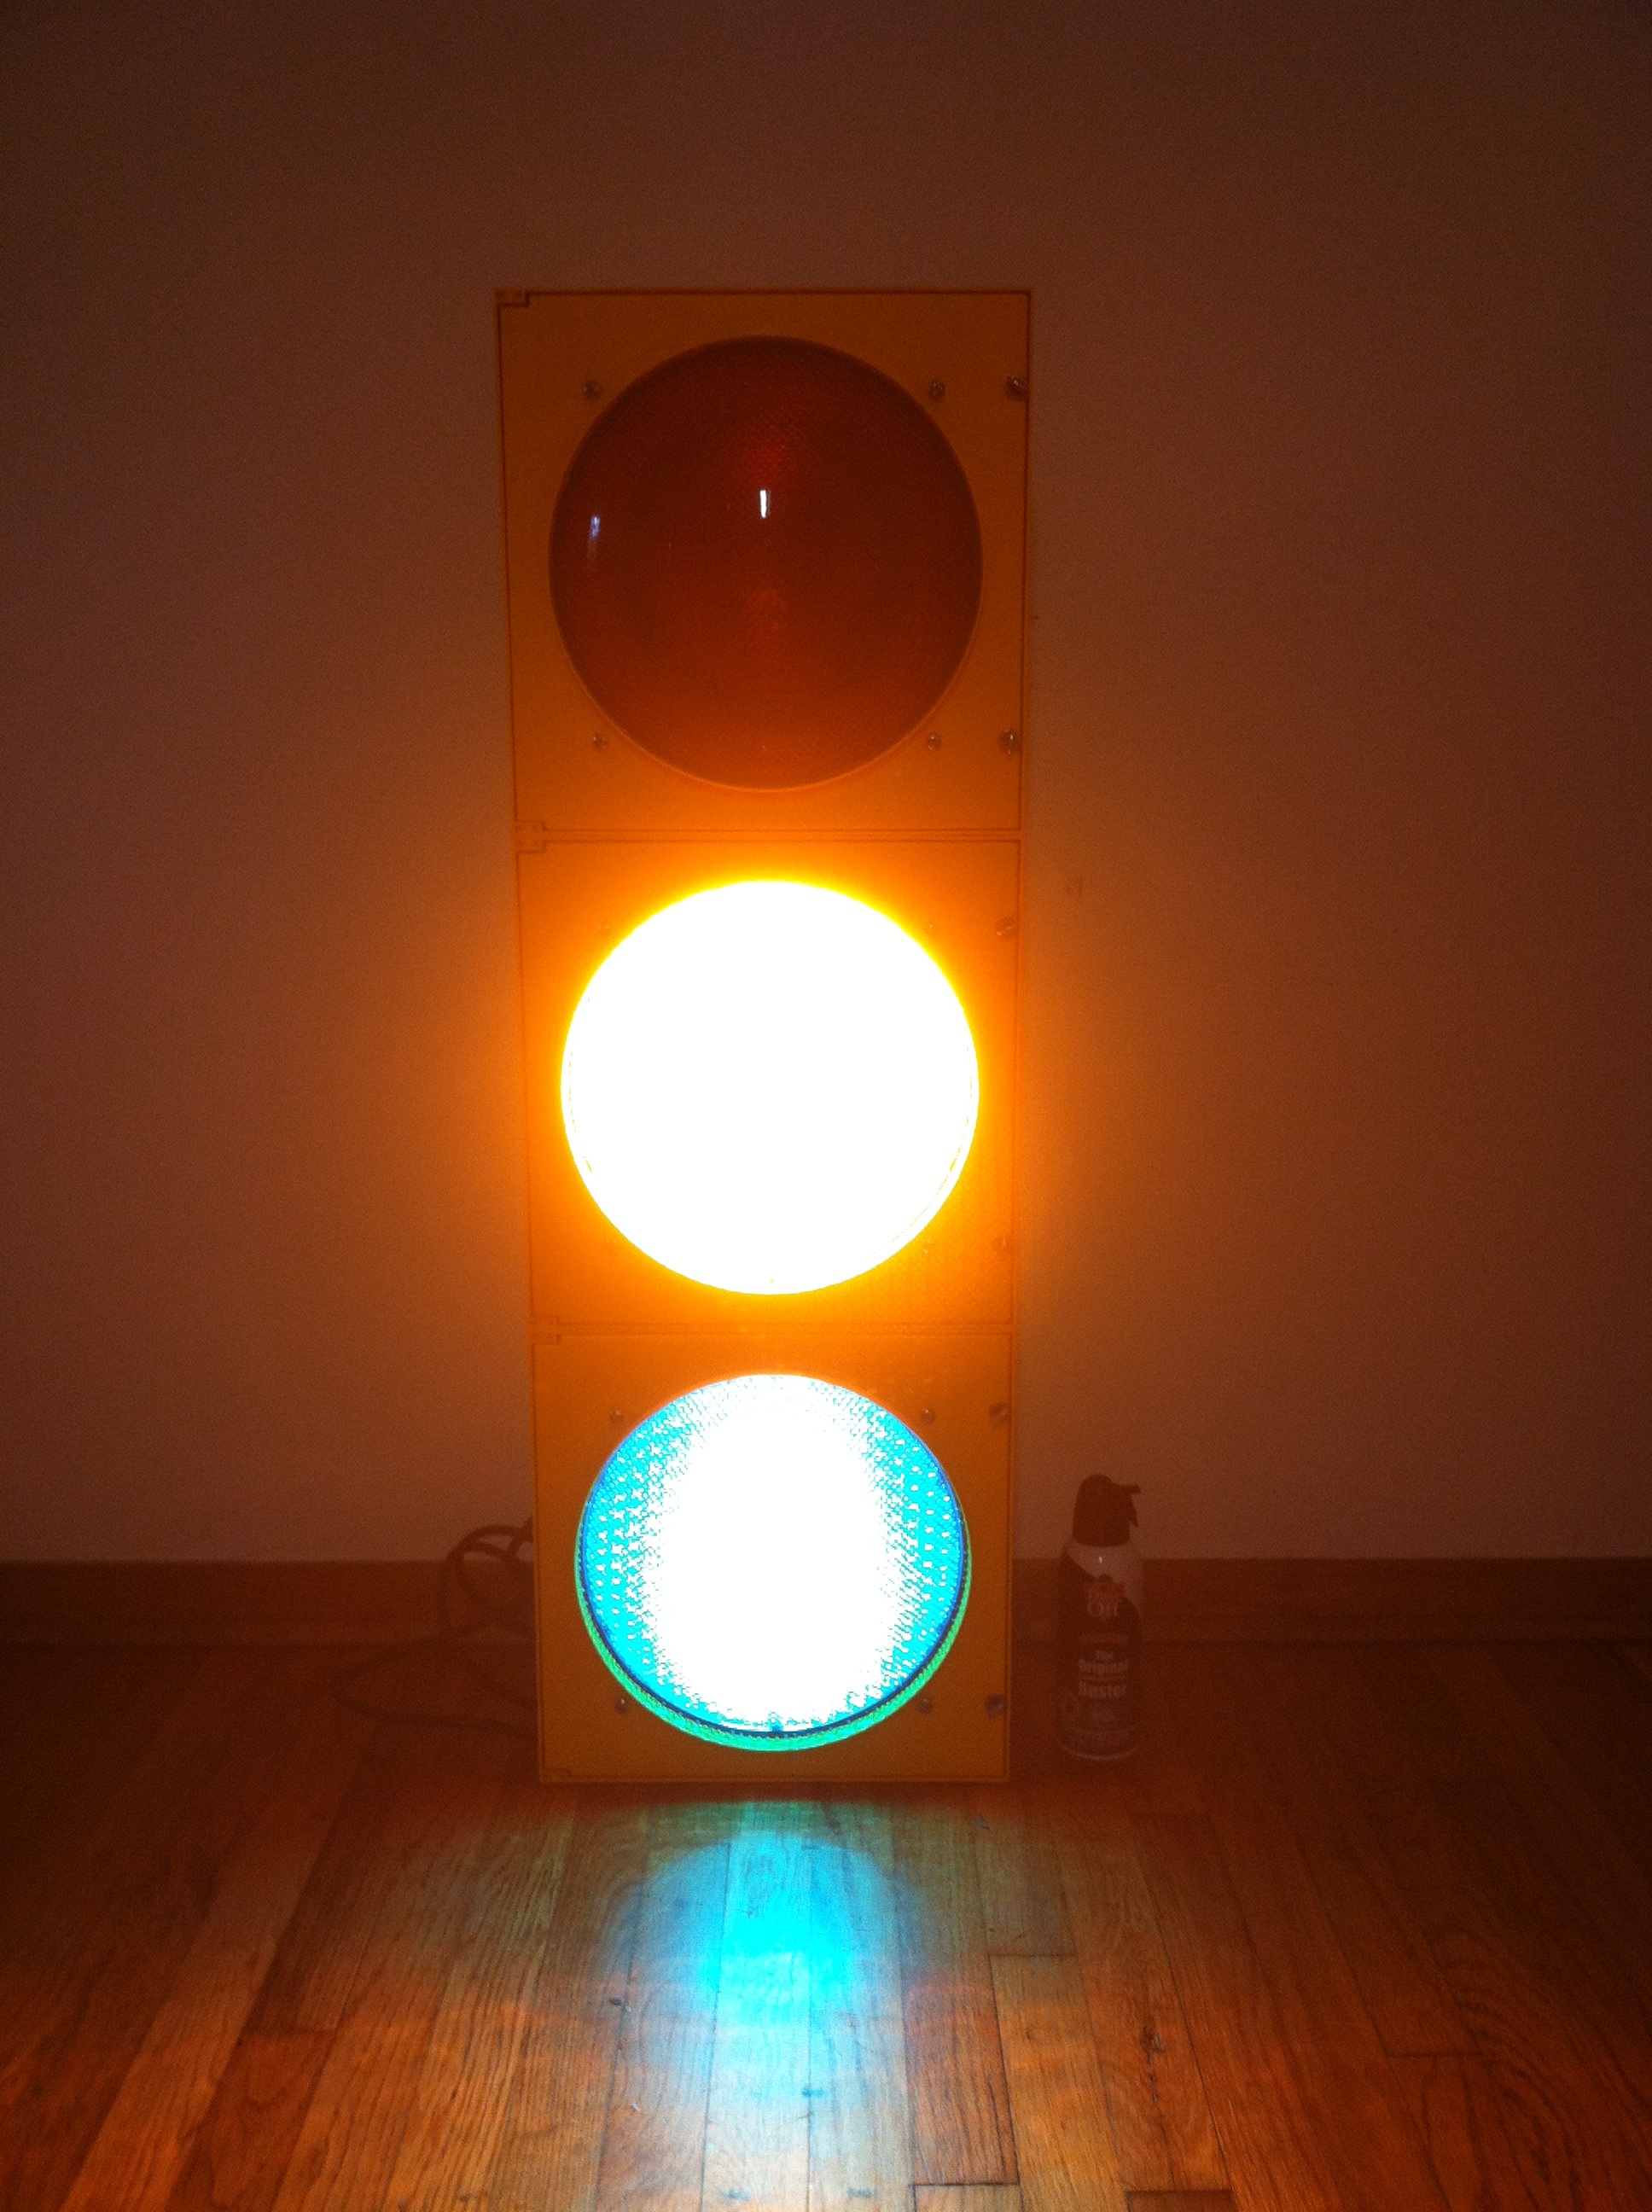
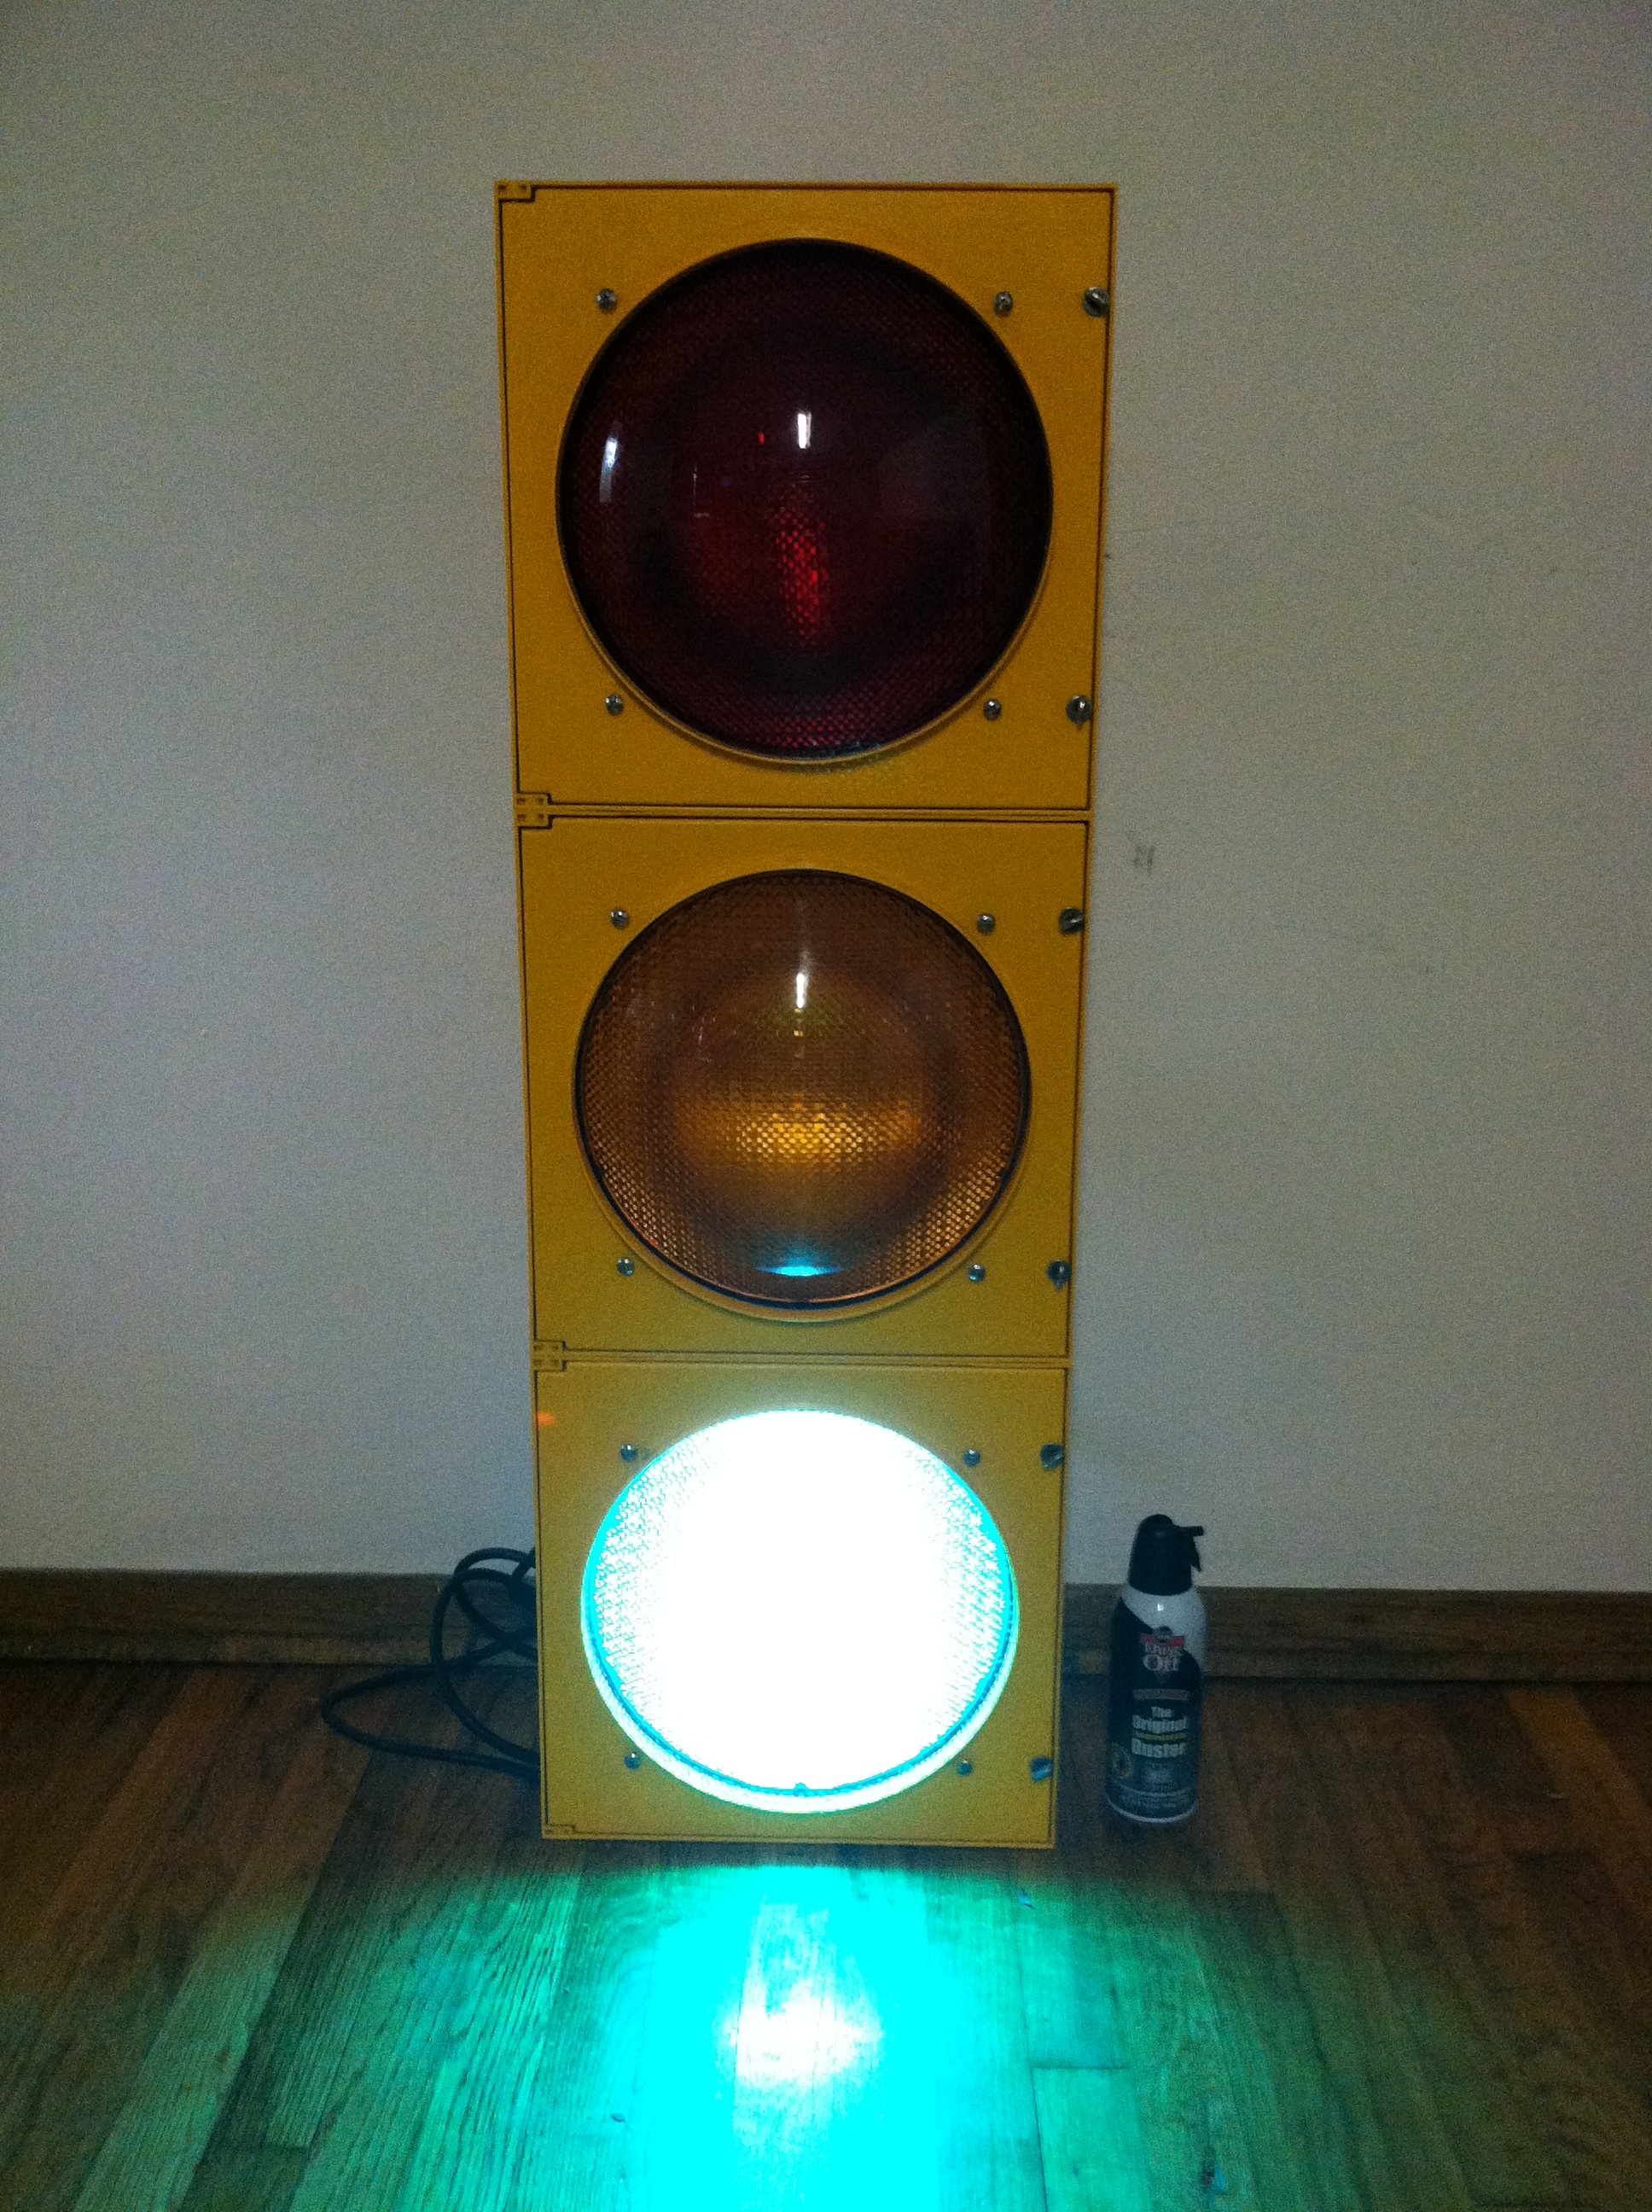
Here the light is powered on with the only wire being for power, with all electronics safely installed inside and the Arduino connecting to my wireless router. When first powered on the Arduino turns on the green and yellow lamps to indicate the WiShield is initializing and connecting to WiFi. Once connected the Arduino will start downloading the configured URL and display the status.
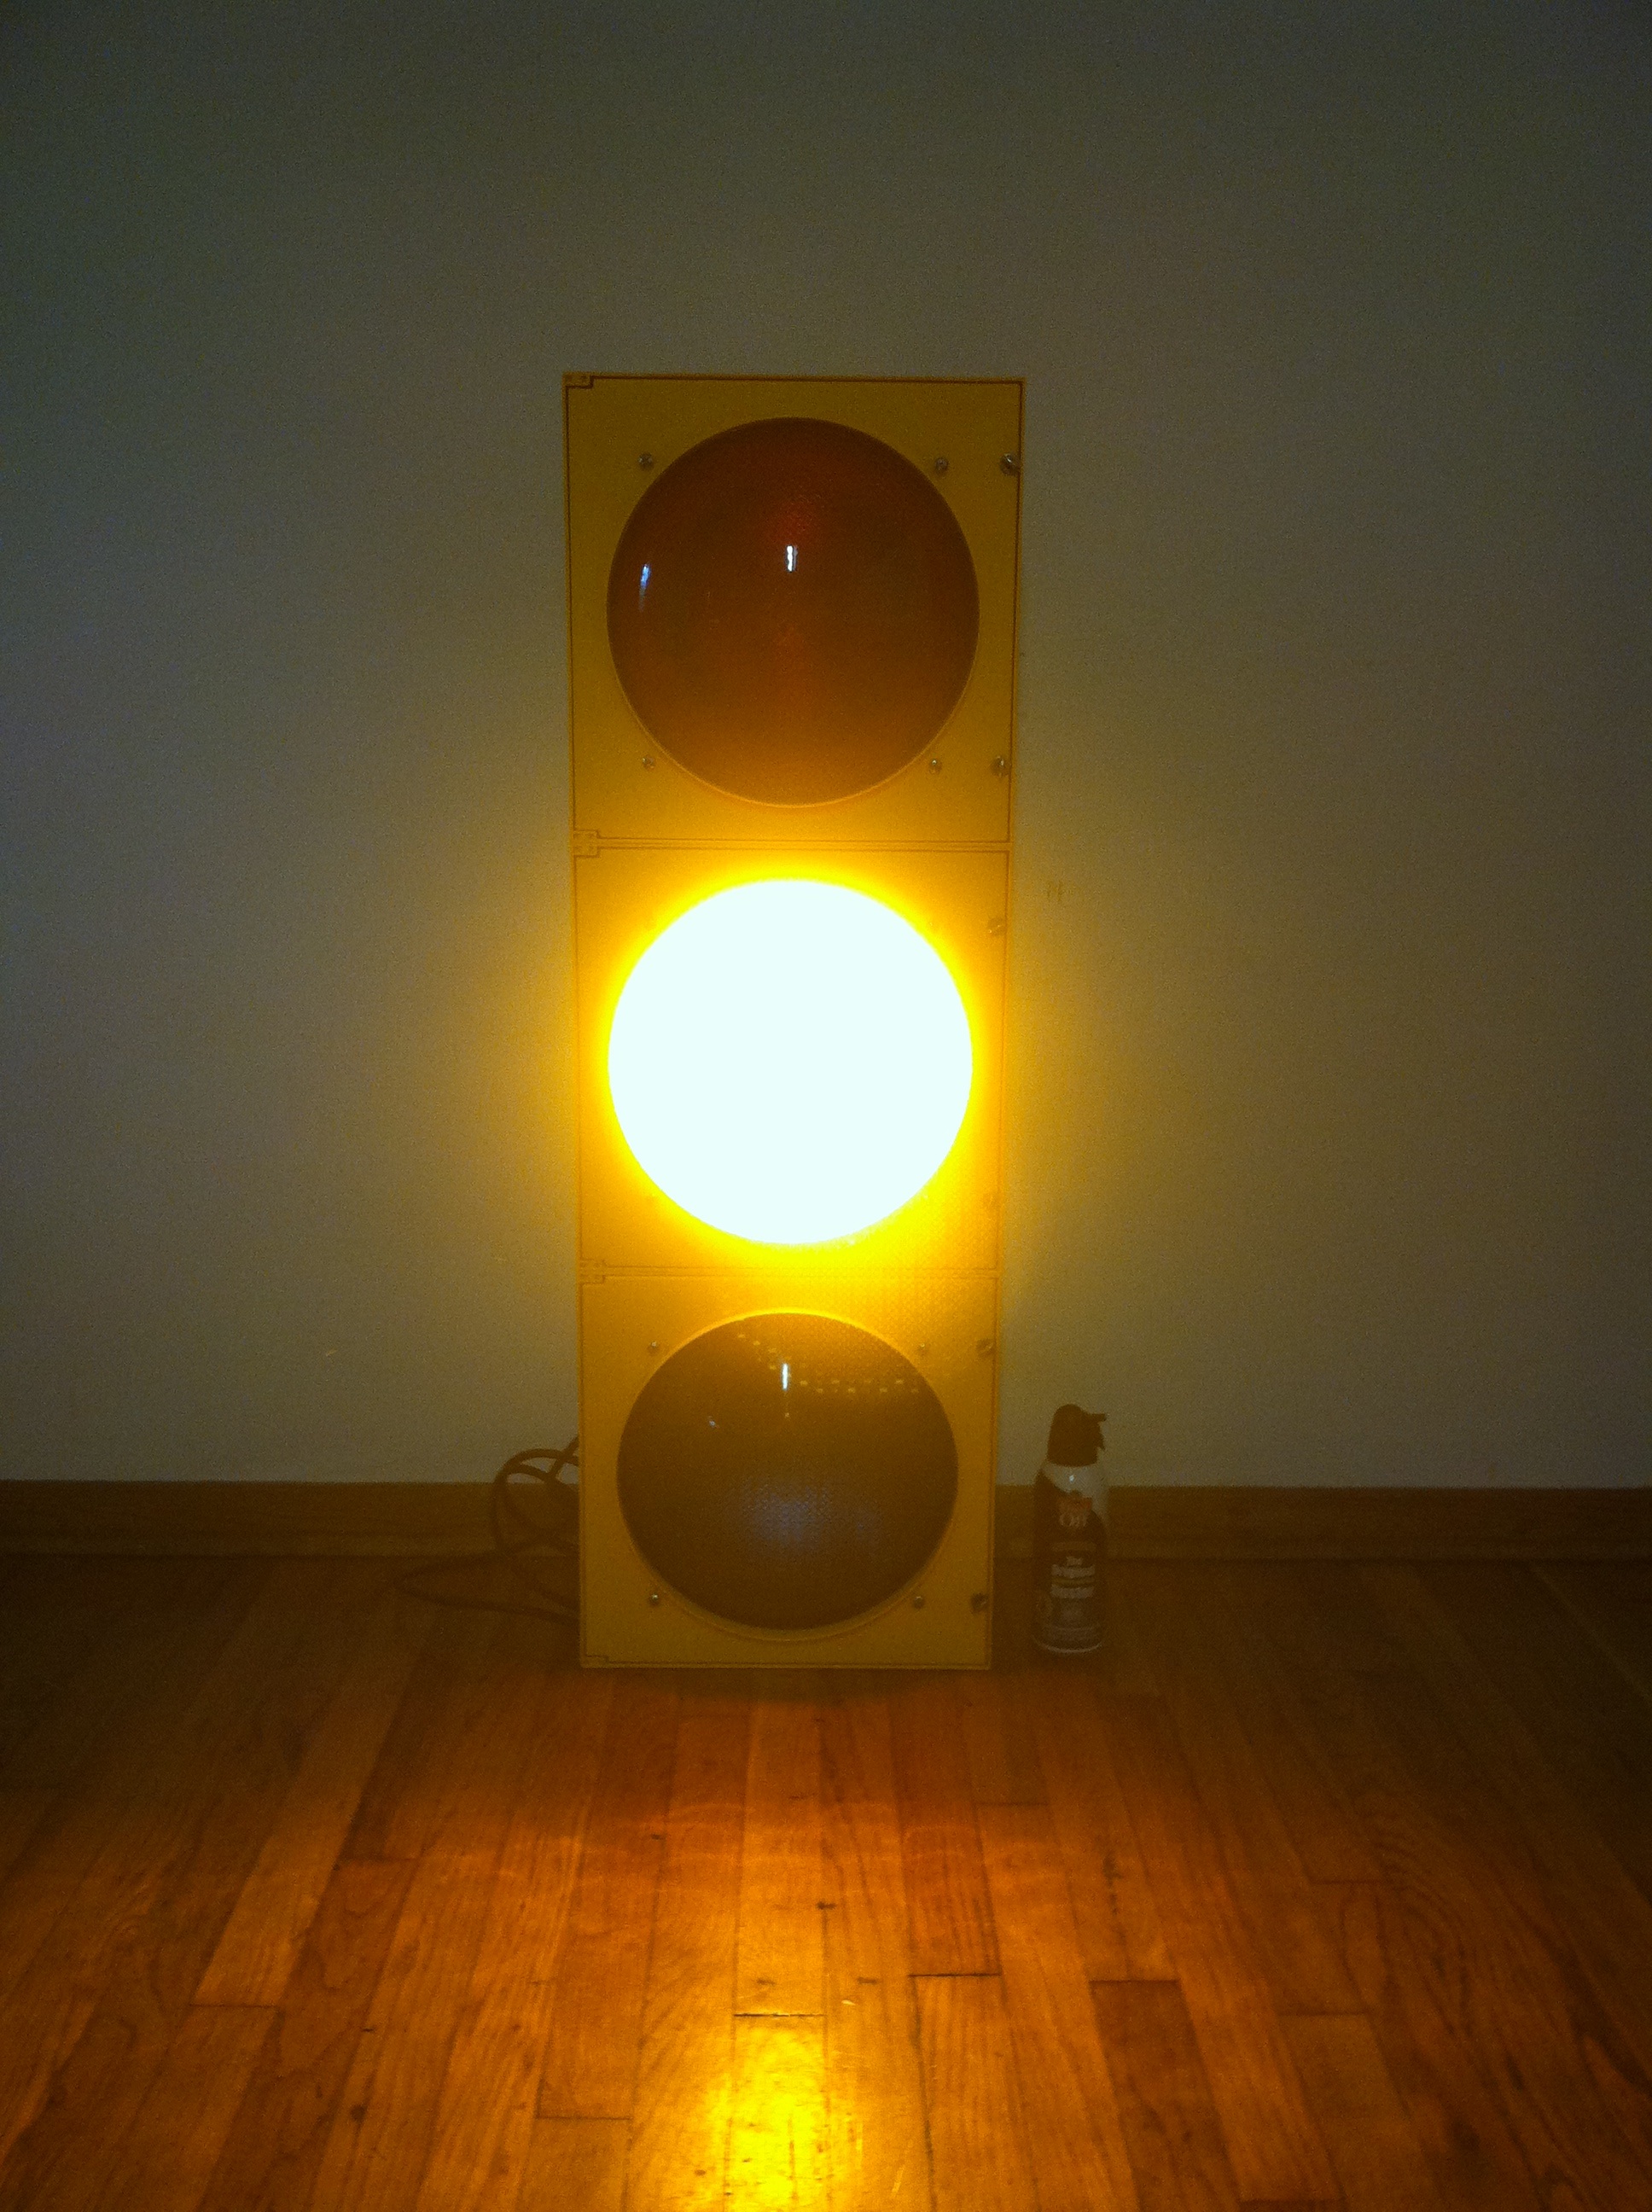
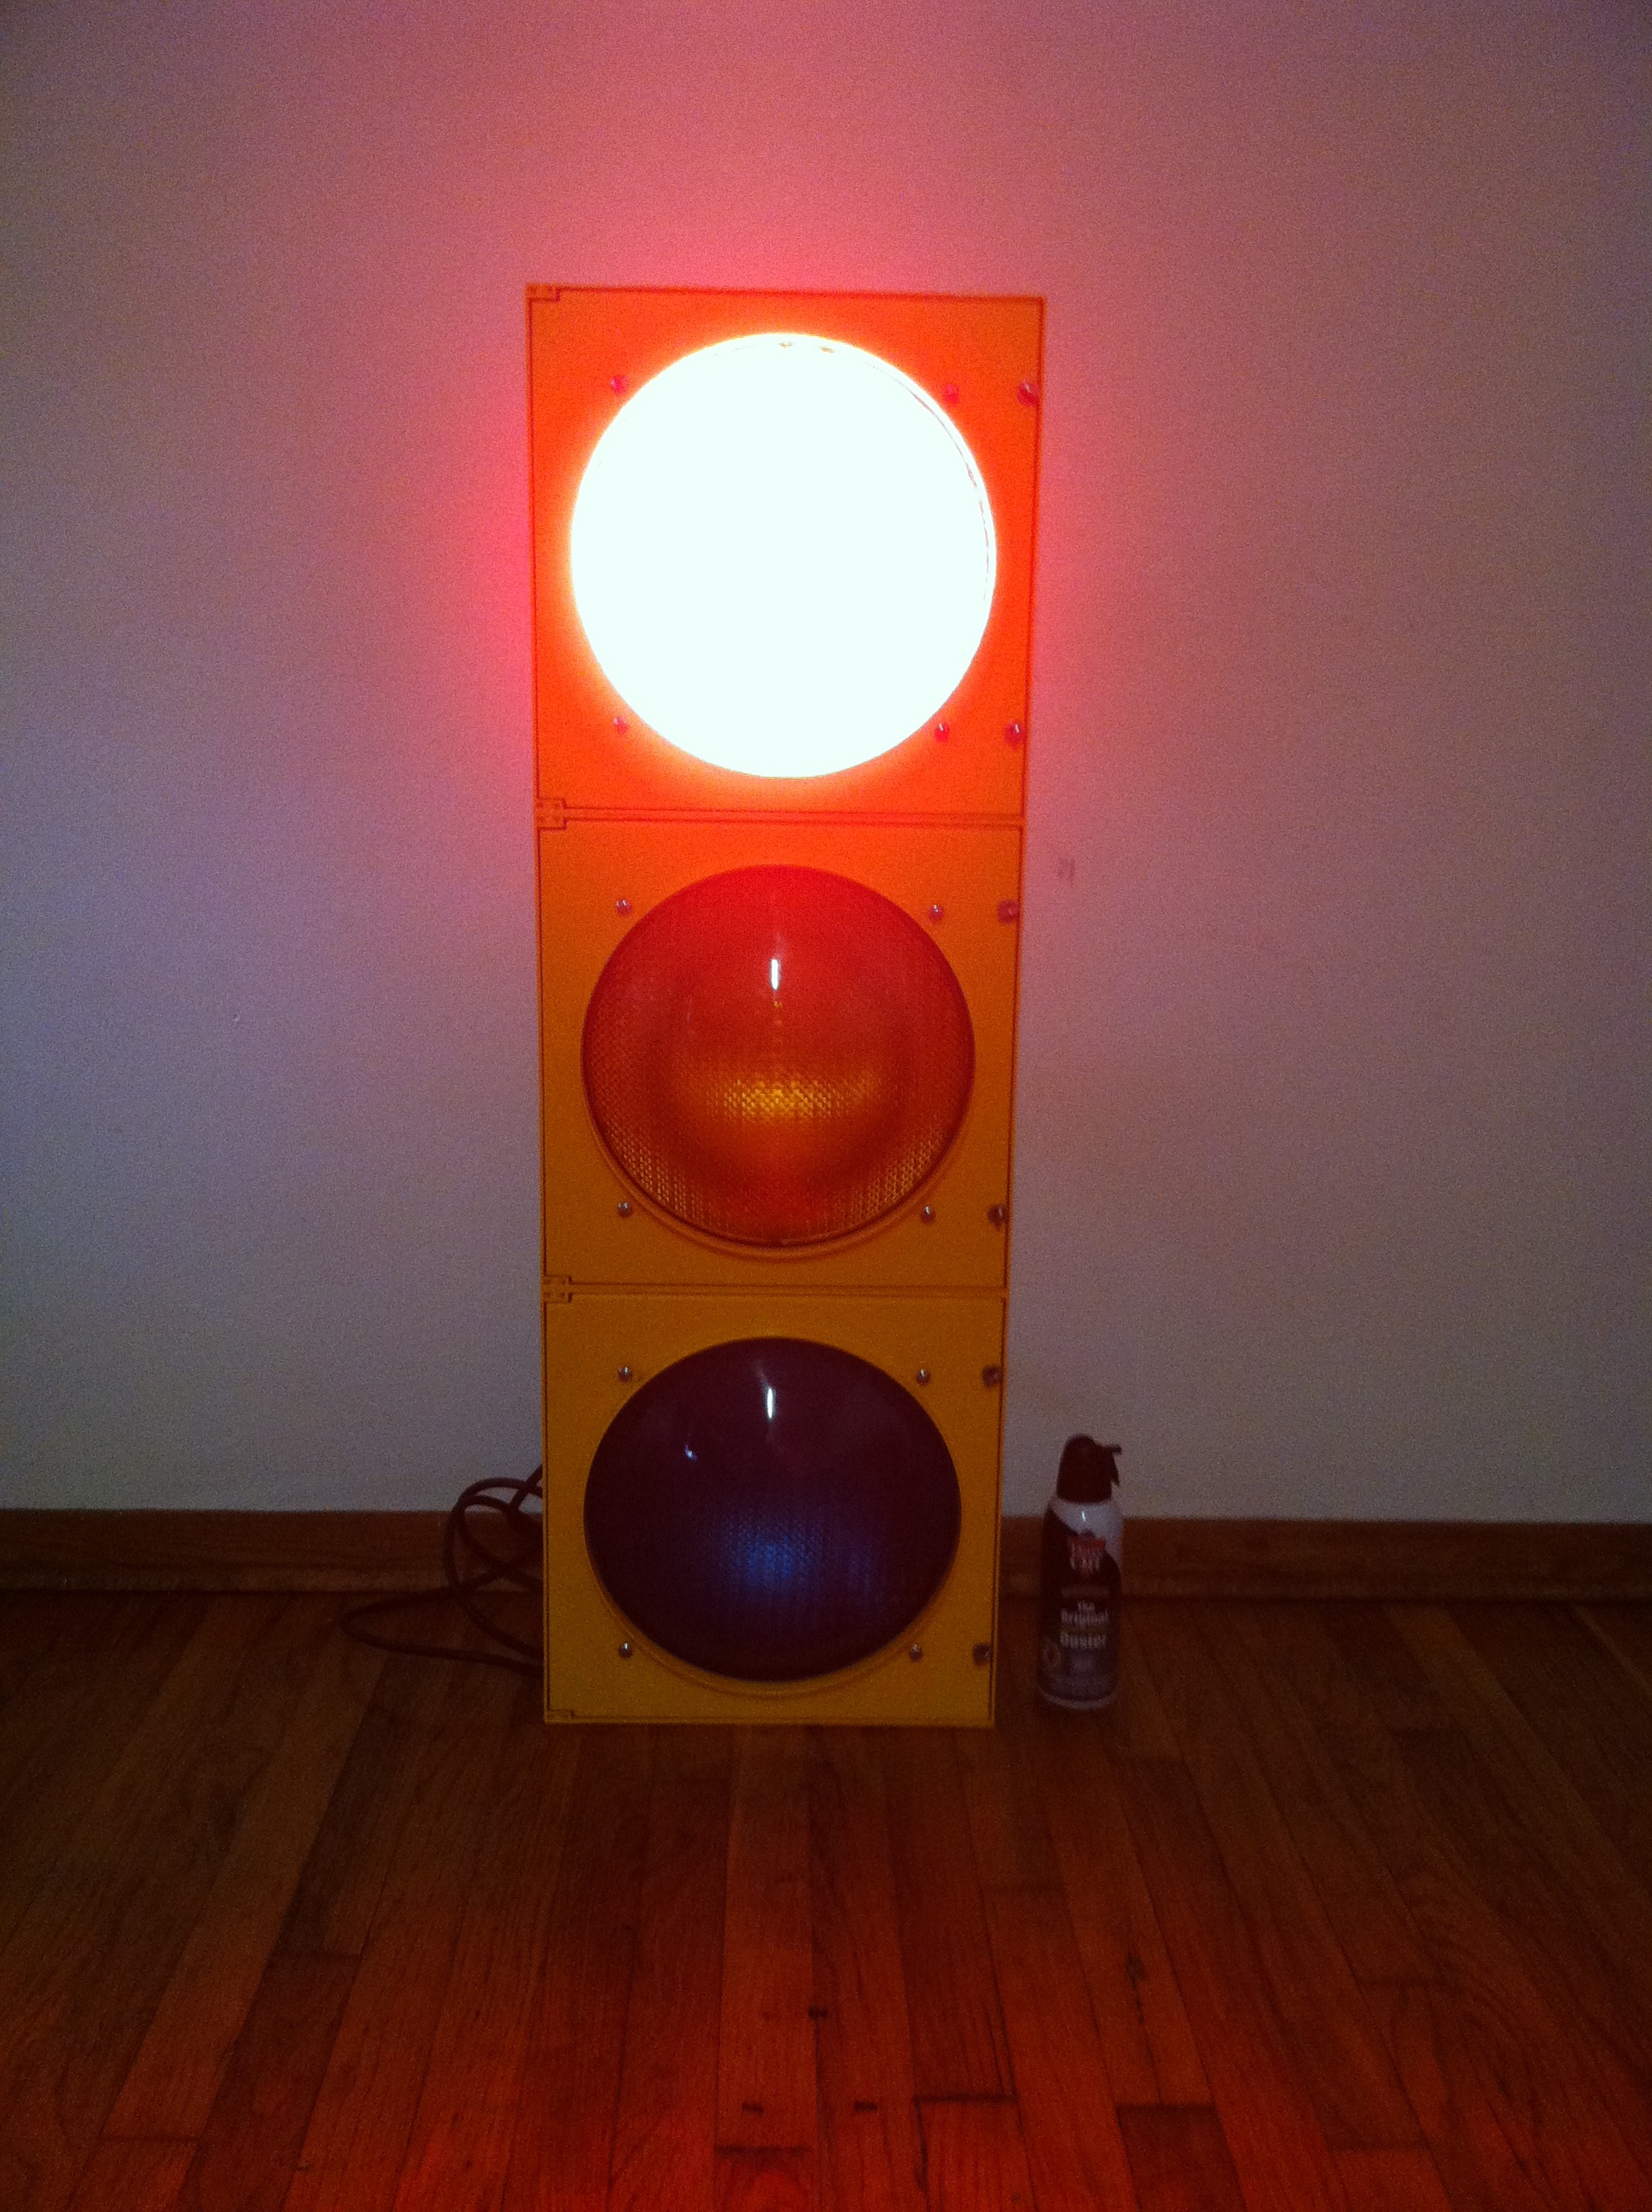
Here I cycle through the 3 colors that the light will display, there are blinking modes as well shown in the video.
Code
The traffic light runs the WiServer library in conjunction with a sophisticated program used to pull down status updates and provide a status page to check debug info remotely. Click Here to download the traffic light sketch. Click Here to download the modified WiShield library.
Requirements
To compile this sketch it is necessary to use Arduino Environment 0023 (the WiServer Library conflicts with the latest version. Secondly you will need the modified WiServer Library, extract the WiShield.zip to your Arduino libraries folder. If you receive compile errors either you are using a different version of the Arduino Environment or you need to reimport the WiShield library into your sketch. To do this place your cursor at the beginning of the sketch and go to Sketch -> Import Library -> WiShield, then remove the lines it adds to the top of the sketch.
Code Excerpts
// Include AVR and WiServer library
#include <avr/wdt.h>
#include <avr/pgmspace.h>
#include
extern "C" {
  #include
}
The above will include the necessary AVR libraries, WiServer, and the g2100 library. Using the extern directive it is possible to include and execute C code within our C++ application.
// Define Pins that control the Red, Yellow, and Green lights
const int redPin = 5;
const int yellowPin = 6;
const int greenPin = 7;
The above defines which digital pins (or analog it doesn’t matter) will control the power transistors which drive the relays which switch the A/C power on and off to the individual lamps.
// Define the IP and host that this sketch will use to connect
uint8 remote_ip[] = {11,22,33,44};
char remote_host[] = {"xodustech.com"};
The above defines which IP and Host that will be used to retrieve data, here only the IP is important the hostname is not fully supported by the WiServer library but must be included anyway.
// Define the Wifi Connection parameters
unsigned char local_ip[] = {192,168,1,5};
unsigned char gateway_ip[] = {192,168,1,1};
unsigned char subnet_mask[] = {255,255,255,0};
unsigned char wireless_mode = WIRELESS_MODE_INFRA;
unsigned char security_type = WIRELESS_TYPE_WPA2;
char ssid[] = {"linksys"};
const prog_char security_passphrase[] PROGMEM = {"linksyskey"};
prog_uchar wep_keys[] PROGMEM = {
  0x01, 0x02, 0x03, 0x04, 0x05, 0x06, 0x07, 0x08, 0x09, 0x0a, 0x0b, 0x0c, 0x0d,
  0x00, 0x00, 0x00, 0x00, 0x00, 0x00, 0x00, 0x00, 0x00, 0x00, 0x00, 0x00, 0x00,
  0x00, 0x00, 0x00, 0x00, 0x00, 0x00, 0x00, 0x00, 0x00, 0x00, 0x00, 0x00, 0x00,
  0x00, 0x00, 0x00, 0x00, 0x00, 0x00, 0x00, 0x00, 0x00, 0x00, 0x00, 0x00, 0x00
};
unsigned char ssid_len;
unsigned char security_passphrase_len;
The above defines the parameters WiServer will use to establish a connection with your access point if in infrastructure mode or client if in adhoc mode. Due to the current state of the WiServer library DHCP would consume more memory than is reasonable and is easier to simply define an IP out of your routers normal DHCP range. WiServer supports WEP/WPA/WPA2 security, the security_passphrase must be set and blank if in WEP mode, wep_keys must be defined even if the security type is WPA/WPA2. Notice the usage of the PROGMEM directive in the wep_keys variable declaration, this stores the data in Flash instead of in RAM, special routines must be used to retrieve this data to be used, more on that subject below.
GETrequest getLight(remote_ip, 80, remote_host, "/light.php");
The above defines the GET Request object that will be used to query the remote server, this gets provided the remote_ip, remote_host, the port (80 by default), and the remote URL that will be downloaded.
void setup() {
  Serial.begin(9600);

  // Set the mode of the Red, Yellow, and Green pins as output
  pinMode(redPin, OUTPUT);
  pinMode(yellowPin, OUTPUT);
  pinMode(greenPin, OUTPUT);

  // Intitialize the WiFi connection and callback functions
  lightModeGreenYellow();
  serialPrint(PSTR("Intitializing the Wifi connection..."));
  WiServer.init(sendPage);
  getLight.setReturnFunc(collectData);
  lightModeRedYellow();
  serialPrint(PSTR(" done"));

  // Enable the watchdog timer for 8 seconds
  wdt_enable(WDTO_8S);
}
The setup() function is only called once and is used here to setup the WiFi Connection and setup the callbacks for the collectData() function and the sendPage() function, more on these later. I use the red, yellow, and green lights on the traffic signal to indicate the status of the Arduino as it boots up and initializes the WiFi connection. Lastly we enable the watchdog timer built into the latest Arduino Uno boot loader, here we tell the watchdog to reset the uC automatically if a wdt_reset() is not received every 8 seconds.
void loop() {
  if (zg_get_conn_state() != 1) {
    // Reset the uC if the wifi connection has dropped out
    soft_reset();

  } else if (zg_get_conn_state() == 1) {
    // Call the blink routine to process blinks
    lightModeBlink();

    // Check if connection is inactive to start a new connection
    if ((!(getLight.isActive())) && (millis() > (lastUpdate + 5000))) {
      serialPrint(PSTR("\nQuerying... "));
      returnData = "";
      getLight.submit();
    }

    // Check if the millis() timer has rolled over
    if (millis() < lastUpdate) {
      lastUpdate = millis();
      lastChange = lastUpdate;
    }

    // Reset the watchdog timer
    wdt_reset();

    // Process pending tasks in the WiServer queue
    WiServer.server_task();
    delay(10);
  }
}
After the setup() function is finished the Arduino will repeatedly call the loop() function until it either freezes or you cut the power. The zg_get_conn_state() function is used to determine if the WiShield is connected, although in most cases if the router is reset the Arduino will need to be reset as well as the WiServer.init() function can permanently block program execution if it fails. The blink routine is always called when the connection is active even if the light is not blinking, this is due to the Arduino’s single thread limitation meaning there is no multitasking here, blinks are toggled with global variables defined at the top of the sketch. The getLight.submit() function is run every 5 seconds only if getLight() is not currently running. WiServer.server_task() will process tasks in the WiServer queue such as displaying a web page or downloading data with the get request. A delay of 10ms is introduced to keep things stable as running any faster can cause the WiShield to glitch.
void collectData(char* data, int len) {
  // Check if its the end of the data stream
  if (len == 0) { lightMode(); }

  // Loop through the data stream
  while (len-- > 0) {
    // Check size of return stream and truncate
    if (returnData.length() >= 16) {
      returnData = returnData.substring((returnData.length() - 16));
    }
    returnData += *(data++);
  }
}
The collectData() function is called as the getLight() receives data from the WiShield. It is called in nibbles of generally one character at a time. It is called one last time when the stream ends, the lightMode() function is called when the stream ends to process the data into a display mode. The stream is truncated at 16 bytes of data as returnData will also include the headers and can easily overwhelm the Arduino’s RAM causing strange program behavior.
void lightMode() {
  // Strip the headers and extraneous data from the return string
  returnData = returnData.substring((returnData.lastIndexOf("\n") + 1));
  serialPrint(PSTR("Signal: "));
  Serial.print((zg_get_rssi() / 200.00 * 100.00));
  serialPrint(PSTR("% - Return Data: "));
  Serial.print(returnData);

  // Check if mode has changed and process change
  if (returnData != lastMode) {
    blinkMode = 0;
    if (returnData == "green") { lightModeGreen(); }
    else if (returnData == "yellow") { lightModeYellow(); }
    else if (returnData == "red") { lightModeRed(); }
    else if (returnData == "blink-red") { lightModeBlinkStart(3); }
    else if (returnData == "blink-yellow") { lightModeBlinkStart(2); }
    else if (returnData == "blink-green") { lightModeBlinkStart(1); }
    else if (returnData == "blink-all") { lightModeBlinkStart(-1); }
    else { lightModeRedGreen(); }
    lastMode = returnData;
    lastChange = millis();
  }

  lastUpdate = millis();
}
The lightMode() function is called once the collectData() stream has finished, first we strip further extraneous data from the returnData variable, the result is the up to 16 characters from the last \n. On the server side of things the page simply responds with the text “green” (without quotes or any additional new lines) to indicate the traffic signal should be green. The lastChange, lastMode, and lastUpdate are updated, some of which are used as status info on the internal web page.
boolean sendPage(char* URL) {
  // Detect requested page and print webpage body
  if (strcmp(URL, "/") == 0) {
    webPrint(PSTR("\n\n\t"));
    ...
  } else if (strstr(URL, "/status")) {
    webPrint(PSTR("{\"light_mode\":\""));
    WiServer.print(lastMode);
    ...
    webPrint(PSTR("\"}"));
  } else if (strcmp(URL, "/reset") == 0) {
    webPrint(PSTR("Resetting Traffic Light..."));
    soft_reset();
  } else {
    webPrint(PSTR("Requested page "));
    WiServer.print(URL);
    webPrint(PSTR(" not found."));
  }

  return true;
}
This function has been trimmed down though the full code is available in the download section. The SendPage() function is responsible for displaying content when the IP of the WiShield has been called in a browser. Using the custom function webPrint() in combination with PSTR() allows the usage of large strings that are stored in Flash instead of RAM, this is equivalent to using PROGMEM in your variable declaration, more on this later. The function is capable of responding to different URLs, the main page is a simple jQuery page with an AJAX call to the /status URL on the WiShield. This allows the ability to remotely monitor the WiShield without being connected over serial.
void soft_reset() {
  do {
    wdt_enable(WDTO_15MS);
    for(;;) { }
  } while(0);
}
This function can be called to reset the Arduino and start the entire sketch over.
void webPrint(PGM_P s) {
  char c;
  while ((c = pgm_read_byte(s++)) != 0)
    WiServer.print(c);
}

void serialPrint(PGM_P s) {
  char c;
  while ((c = pgm_read_byte(s++)) != 0)
    Serial.print(c);
}
These functions are designed to wrap the PSTR() function and allow the usage of large strings to be sent to Serial.print() and WiServer.print(). PSTR() signals the compiler to store the string in the parenthesis inside of Flash instead of RAM, by calling Serial.print(“string”); in your sketch this tells the compiler to store your string in RAM, the string will always be in RAM even if the function is never called and even after. Usage of these functions can be seen in the above functions for sendPage(), lightMode(), setup(), and loop() to name a few.